Company Info
Download
Peter Gulutzan's blog
screenshots
Books by employees
Glossary
Home
Version 2.4.0
The ocelotgui GUI, a database client, allows users to connect to a MySQL or MariaDB DBMS server, enter SQL statements, and receive results. Some of its features are: syntax highlighting, user-settable colors and fonts for each part of the screen, result-set displays with multi-line rows and resizable columns, and a debugger.
Copyright (c) 2024 by Peter Gulutzan. All rights reserved.
For the GPL license terms see https://github.com/ocelot-inc/ocelotgui/blob/master/LICENSE.GPL.
For instructions for end users see the User Manual.
For ocelotgui screenshots see http://ocelot.ca/screenshots.htm.
For ocelotgui/debugger screenshots see http://ocelot.ca/blog/the-ocelotgui-debugger.
This README file has installation instructions, screenshots, and the user manual.
Contents
Installing
... Prerequisites ... Getting the Qt library ... Getting the libmysqlclient.so library ... Getting the ocelotgui executable package ... Starting the programIllustrating
... Some screenshotsUsing
... User Manual ... Executive Summary ... The developer, the product, and the status ... Downloading, installing, and building ... Starting ... Statement widget ... Client statements ... History widget ... Result widget ... Menu ... Debugger ... Special effects ... Explorer widget ... ERDiagram ... Charts ... Make your own menus ... Make your own plugins/A> ... ContactAppendixes
... Appendix 1 Details about ocelotgui options ... Appendix 2 Reference for the ocelotgui debugger ... Appendix 3 Tarantool ... Appendix 4 windows ... Appendix 5 Getting and using the ocelotgui sourcePrerequisites
The installation instructions in this section are for Linux. If you prefer to run on Windows, read the installation instructions in Appendix 4 windows and come back to read the User Manual section. The basic prerequisites for installation are Linux, and the Qt library. The libmysqlclient library will also be necessary, at runtime.
Getting the Qt library
You probably will find that the Qt package is already installed, since other common packages depend on it. If not, your Linux distro's repositories will provide a Qt package. For example, on some platforms you can say "sudo apt-get install libqt5core5a libqt5widgets5" , on others you can say "dnf install qt qt-x11", on others you can say "dnf install qt5-qtbase qt5-qtbase-gui".
The Qt version number can be found with find /usr/lib -name "libQt*Gui.so*", or find /usr/lib64 -name "libQt*Gui.so*". If the response starts with libQtGui.so.4 then you have Qt4, if the response starts with libQt5Gui.so.5 then you have Qt5. Alternatively it sometimes can be found with qmake -v. Peter Gulutzan supplies executables only for Qt version 5, but often appropriate files are downloaded automatically during ocelotgui installation. To force use of a different Qt version you can build from source.
The Qt library is necessary for ocelotgui installation.
Getting the libmysqlclient.so library
You may find that the libmysqlclient.so library is already installed, if you have used a MySQL or MariaDB client program before. If not, your Linux distro's repositories will contain it, usually with a package name like "libmysqlclient-dev" or "libmysqlclient-devel".
With Fedora the package name may be "mariadb-devel" and the library name may be "libmariadb.so" or "libmariadbclient.so".A tip for Mageia 5: You can use "urpmf
A tip for openSUSE 13.1: if neither Qt nor libmysqlclient libraries exist, say:
 sudo zypper install libqt5-devel
 sudo zypper install mariadb-client
 sudo zypper install libmysqlclient-devel
The important file is named "libmysqlclient.so" or something similar. If it is not already on the default path, then an error or warning will appear when you try to run ocelotgui. Find it, and say something like
export LD_RUN_PATH=[path to directory that contains libmysqlclient.so]Several other directories are searched; for details start ocelotgui after installation and choose Help | libmysqlclient.
The libmysqlclient library is not necessary for ocelotgui installation; however, it is necessary at runtime in order to connect to a MySQL or MariaDB server.
Getting the ocelotgui executable package
There are ocelotgui binary packages for platforms such as Ubuntu/Mint/MX where "Debian-like" packages are preferred, or platforms such as Mageia/SUSE/Fedora (but not CentOS 7) where "RPM-like" packages are preferred. If one of the following ocelotgui binary packages is compatible with your platform, cut and paste the corresponding pair of instructions onto your computer and you can be up and running in about 15 seconds.
For 32-bit, Debian-like, Qt5
wget https://github.com/ocelot-inc/ocelotgui/releases/download/2.4.0/ocelotgui_2.4.0-1_i386.deb
sudo apt install ./ocelotgui_2.4.0-1_i386.deb
For 64-bit, Debian-like, Qt5
wget https://github.com/ocelot-inc/ocelotgui/releases/download/2.4.0/ocelotgui_2.4.0-1_amd64.deb
sudo apt install ./ocelotgui_2.4.0-1_amd64.deb
For 64-bit, RPM-like, Qt5
wget https://github.com/ocelot-inc/ocelotgui/releases/download/2.4.0/ocelotgui-2.4.0-1.x86_64.rpm
sudo rpm -i ocelotgui-2.4.0-1.x86_64.rpm
For 64-bit, any Linux, Qt5
wget https://github.com/ocelot-inc/ocelotgui/releases/download/2.4.0/ocelotgui-2.4.0.tar.gz
tar zxvf ocelotgui-2.4.0.tar.gz
ocelotgui/ocelotgui-qt5
For 64-bit, any Linux, Qt4 (deprecated)
wget https://github.com/ocelot-inc/ocelotgui/releases/download/2.4.0/ocelotgui-2.4.0.tar.gz
tar zxvf ocelotgui-2.4.0.tar.gz
ocelotgui/ocelotgui-qt4
Starting the program
After installing and making sure that ocelotgui is on the path, start it with
ocelotguior use options, for example
ocelotgui --host=127.0.0.1 --user=joe --password=secret-- if the program starts, and menu items such as Help|Manual work, then installation is successful. Stop again with File|Exit or control-Q.
Some screenshots
User Manual
Version 2.4.0, June 4 2024
Copyright (c) 2024 by Peter Gulutzan. All rights reserved.
This program is free software; you can redistribute it and/or modify it under the terms of the GNU General Public License as published by the Free Software Foundation; version 2 of the License.
This program is distributed in the hope that it will be useful, but WITHOUT ANY WARRANTY; without even the implied warranty of MERCHANTABILITY or FITNESS FOR A PARTICULAR PURPOSE. See the GNU General Public License for more details.
You should have received a copy of the GNU General Public License along with this program; if not, write to the Free Software Foundation, Inc., 51 Franklin St, Fifth Floor, Boston, MA 02110-1301 USA
Executive Summary
The ocelotgui application, previously called 'The Ocelot Graphical User Interface', allows users to connect to a MySQL or MariaDB DBMS server, enter SQL statements, and receive results. Some of its features are: syntax highlighting, user-settable colors and fonts for each part of the screen, and result-set displays with multi-line rows and resizable columns, plugins, and a debugger.
The developer, the product, and the status
Peter Gulutzan is a Canadian who has specialized in database products for thirty years, as an employee of Ocelot Computer Services Inc. and MySQL AB and Sun Microsystems and Oracle and HP, or as a contractor for a large company in eastern Europe.
The ocelotgui program is a front end which connects to MySQL (tm) or MariaDB (tm). In some ways it is like the basic mysql client program, with added GUI features: full-screen editing, syntax highlighting, tabular display, customized fonts and colors. It differs from some other front-end GUI products because it is open source (GPL), it is written in C++, and it makes use of the Qt multi-platform widget library.
The product status is: stable. It has been known to work as described in this manual on several Linux distros. It is stable, in the sense that there are no known severe errors and the features are frozen until the next version. Peter Gulutzan will address any bug reports and will answer any questions.
Downloading, installing, and building
To download the product go to https://github.com/ocelot-inc/ocelotgui. Instructions for installation will be in the README.md file. This location may change, or alternate locations may appear. If so there will either be an announcement on github or on ocelot.ca.
The package contains source code and an executable file named ocelotgui-qt5.
Starting
There must be an instance of MySQL or MariaDB running somewhere.
If connection is possible with the mysql client and does not require
unusual options, then connection is possible with ocelotgui. If there is
a my.cnf file, ocelotgui will read it, just as the mysql client would.
If there are connection-related options on the command line, ocelotgui
will accept them just as the mysql client would. Therefore the typical
way to start the program is to say
ocelotgui [--option [--option...]]
For a description of options see Appendix 1 Details about ocelotgui options.
 If a password is required but not supplied, a dialog box will appear.
Or, if the initial attempt to connect fails, an error message will appear
saying it is necessary to choose File|Connect, which will cause the dialog
box to appear. The dialog box has many possible settings
(see the list in Appendix 1;
however, for getting started, the ones that matter most are the ones
at the top: host, port, user, socket, password, protocol.
If the connection still fails, then ocelotgui will still come up,
but only non-DBMS tasks such as screen customizing will be possible.
If a password is required but not supplied, a dialog box will appear.
Or, if the initial attempt to connect fails, an error message will appear
saying it is necessary to choose File|Connect, which will cause the dialog
box to appear. The dialog box has many possible settings
(see the list in Appendix 1;
however, for getting started, the ones that matter most are the ones
at the top: host, port, user, socket, password, protocol.
If the connection still fails, then ocelotgui will still come up,
but only non-DBMS tasks such as screen customizing will be possible.
 In any case, an initial screen will appear. After some activity has
taken place, the screen will have four parts, from top to bottom:
In any case, an initial screen will appear. After some activity has
taken place, the screen will have four parts, from top to bottom:
menu
history widget, where retired statements and diagnostics end up
results widget, where SELECT result sets appear
statement widget, where users can type in instructions.
(And optionally, on the side, an explorer widget.)
Initially, though, only the menu and statement widget will appear.
Again, this should be reminiscent of the way the mysql client works: statements are typed at the bottom of the screen, and appear to scroll off the top after they are executed, with results in the middle.
Statement widget
The statement widget is an editable multi-line text box. The usual control keys that work on other text editors will work here too; see the later description of Menu Item: Edit.
The program includes a syntax checker and can recognize the parts of speech in MySQL grammar. It will do syntax highlighting by changing the color, for example comments will appear in light green, identifiers in green, operators in dark gray, and so on. The colors can be customized, see the later description of Menu Item: Settings.
The left side of the statement widget is reserved for the prompt, and cannot be typed over. Initially the prompt will be 'mysql>' but this can be changed, see the later description of Client Statements: Prompt.
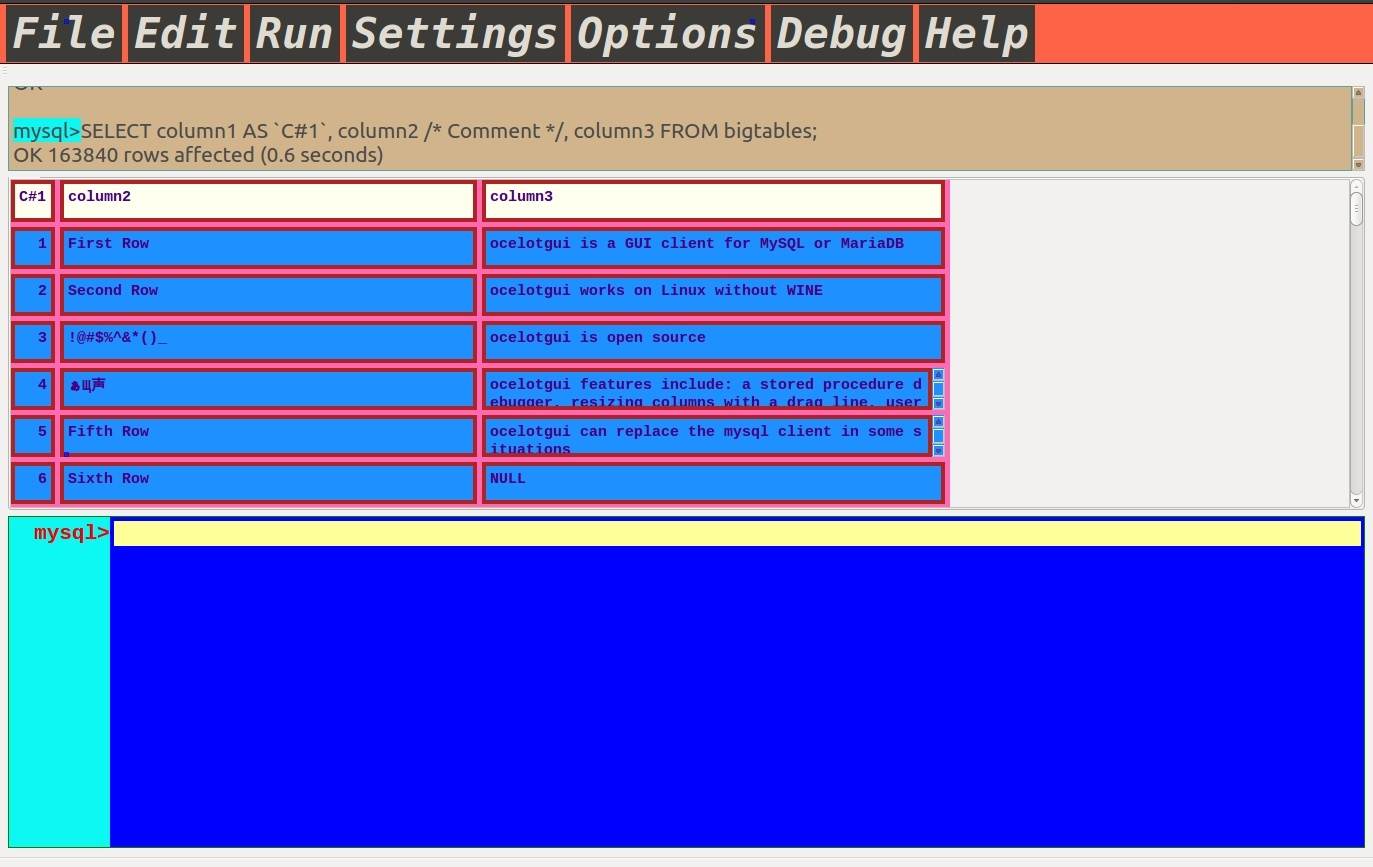
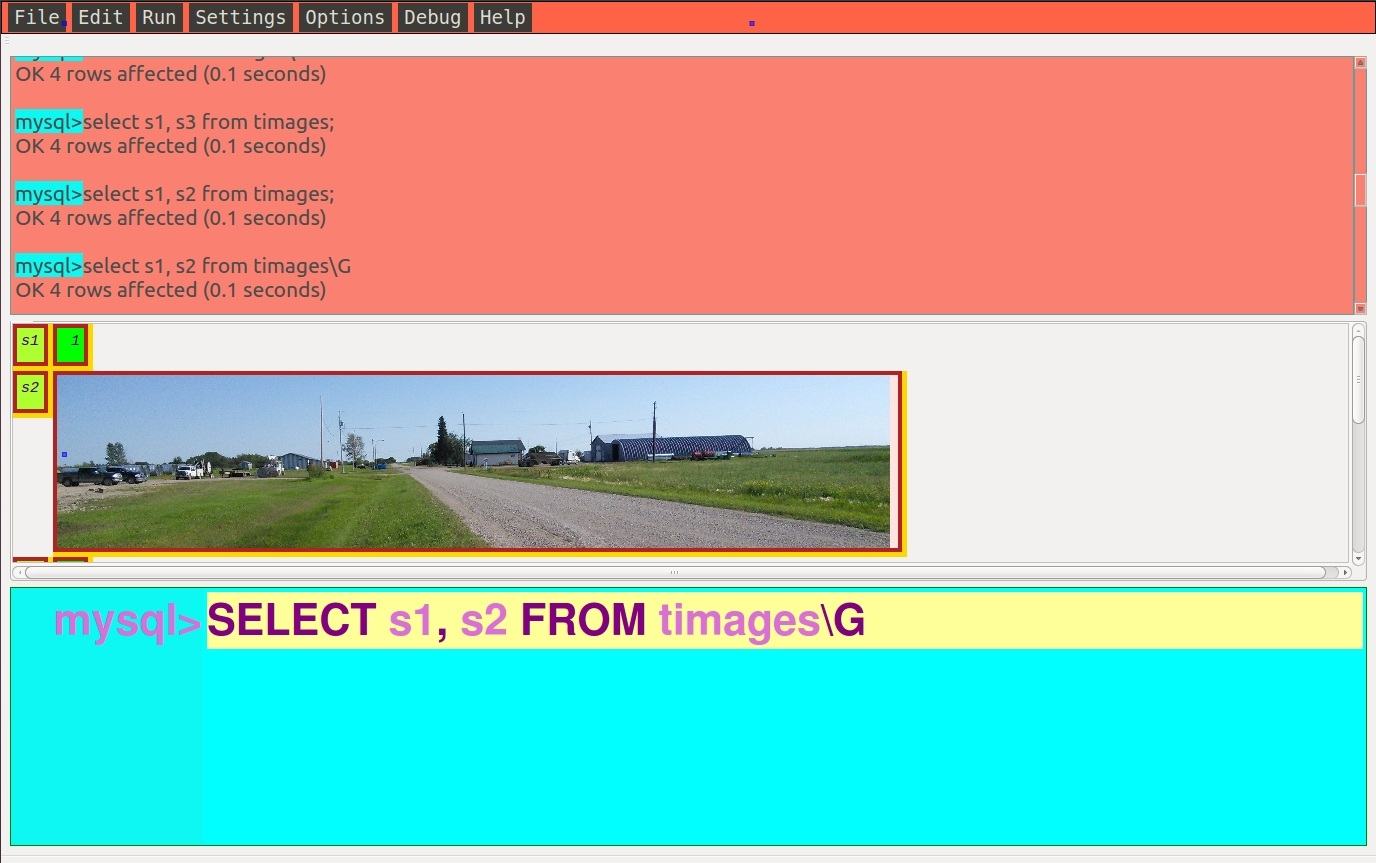
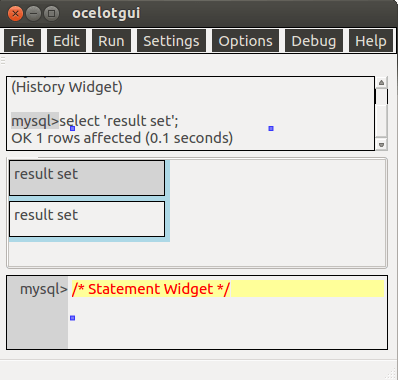
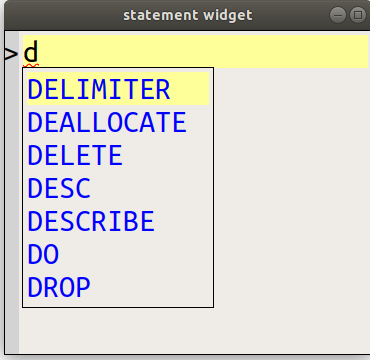
 For example, this screenshot shows the statement widget
after the user has changed the default prompt and
entered an SQL statement.
The statement has keywords in magenta, literals in dark green,
operators in light green, and comments in red.
The prompt on the left has a gray background.
For example, this screenshot shows the statement widget
after the user has changed the default prompt and
entered an SQL statement.
The statement has keywords in magenta, literals in dark green,
operators in light green, and comments in red.
The prompt on the left has a gray background.
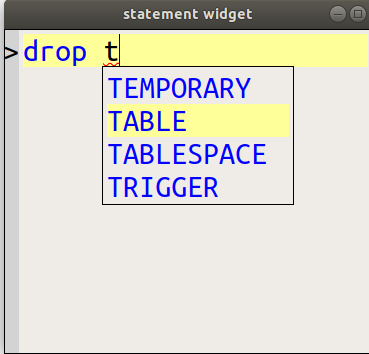
Major Feature Alert: this is not merely a GUI that only will highlight words that are in a list of keywords. This GUI will parse the complete MySQL or MariaDB grammar, without needing to ask the server. So the highlighting will be correct, syntax errors will be underlined in red, and -- since the parsing method is predictive -- there will be continuous hints about what word is expected next, and optionally an error message explaining suspected syntax problems before they go to the server.
Once a statement has been entered and is ready to be executed, the user can hit control-E, choose menu item Run|Execute, or place the cursor at the end of the text (after the ';' or other delimiter) and type Enter. It is legal to enter multiple statements, separated by semicolons, and then execute them in a single sequence.
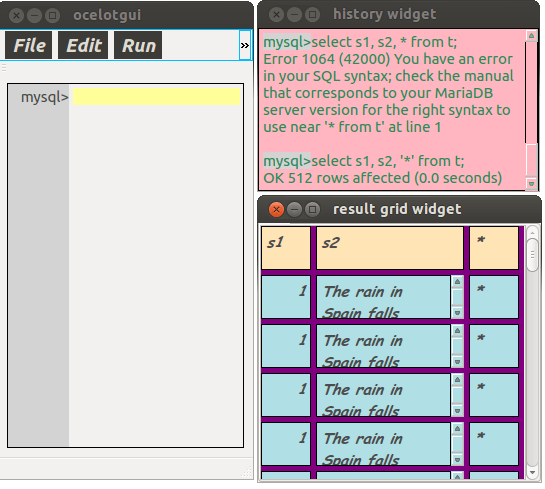
Client statements
A client statement is a statement which changes some behavior of the client (that is, of the ocelotgui front end) but does not necessarily go to the MySQL/MariaDB server. Of the statements that the MySQL Reference manual describes in section 'mysql client commands' https://dev.mysql.com/doc/refman/8.0/en/mysql-commands.html the ocelotgui program has working equivalents for: clear, delimiter, exit, prompt, source, tee, and warnings. For example, entering 'quit;' followed by Enter will cause the program to stop. It is sometimes not mandatory to end a client statement with ';', but is strongly recommended.
There are some enhancements affecting the PROMPT statement. The special sequence '\2' means 'repeat the prompt on all lines', and the special sequence '\L' means 'show line numbers'. For example, 'PROMPT \2\Lmariadb;' will change the prompt so that each line begins with '[line number] mariadb>'.
History widget
Once a statement has been executed, a copy of the statement text and the diagnostic result (for example: 0.04 seconds, OK) will be placed in the history widget. Everything in the history widget is editable including the prompt, and it simply fills up so that after a while the older statements are scrolled off the screen. Thus its main function is to show what recent statements and results were. Statements in the history can be retrieved while the focus is on the statement widget, by selecting 'Previous statement' or 'Next statement' menu items.
Initially the history widget will show some statements from past sessions which are stored in a history file.
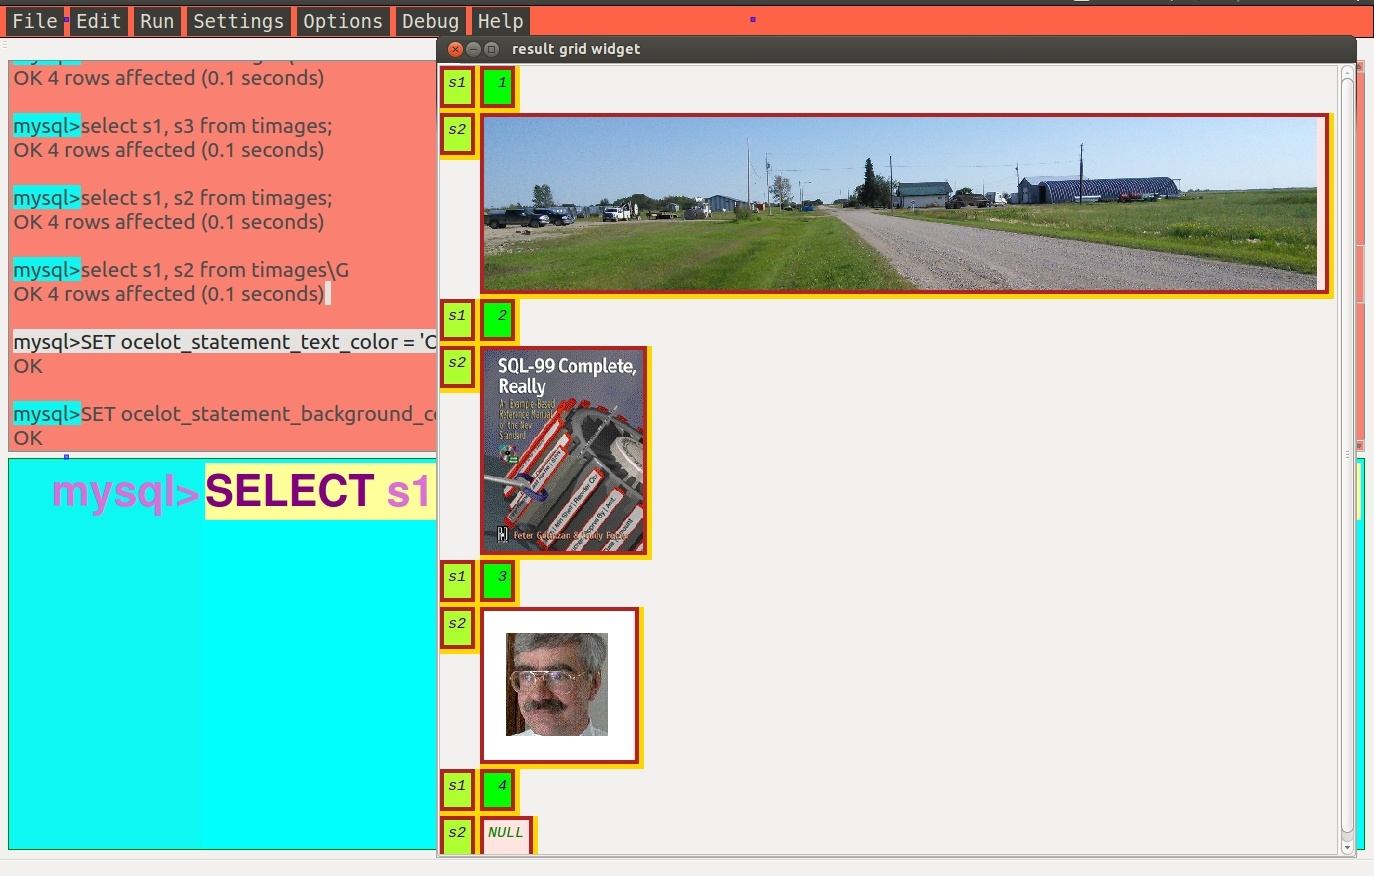
Result widget
If a statement is SELECT or SHOW or some other statement that returns a result set, it will appear in the result widget in the middle area of the screen. The result widget is split up into columns. Each column has a header and details taken from what the DBMS returns.
The width of the column depends on the result set's definition, but extremely wide columns will be split onto multiple lines. That is, one result-set row may take up to five lines. If the data still is too wide or too tall to fit in the cell, then the row will get a vertical scroll bar. The user can change the width of a column by dragging the column's right border to the right to make the column wider, or to the left to make it narrower.
The result widget as a whole may have a horizontal and a vertical scroll bar. The vertical scroll bar moves a row at a time rather than a pixel at a time -- this makes large result sets more manageable, but makes the vertical scroll bar unresponsive if each row has multiple lines and the number of rows is small.
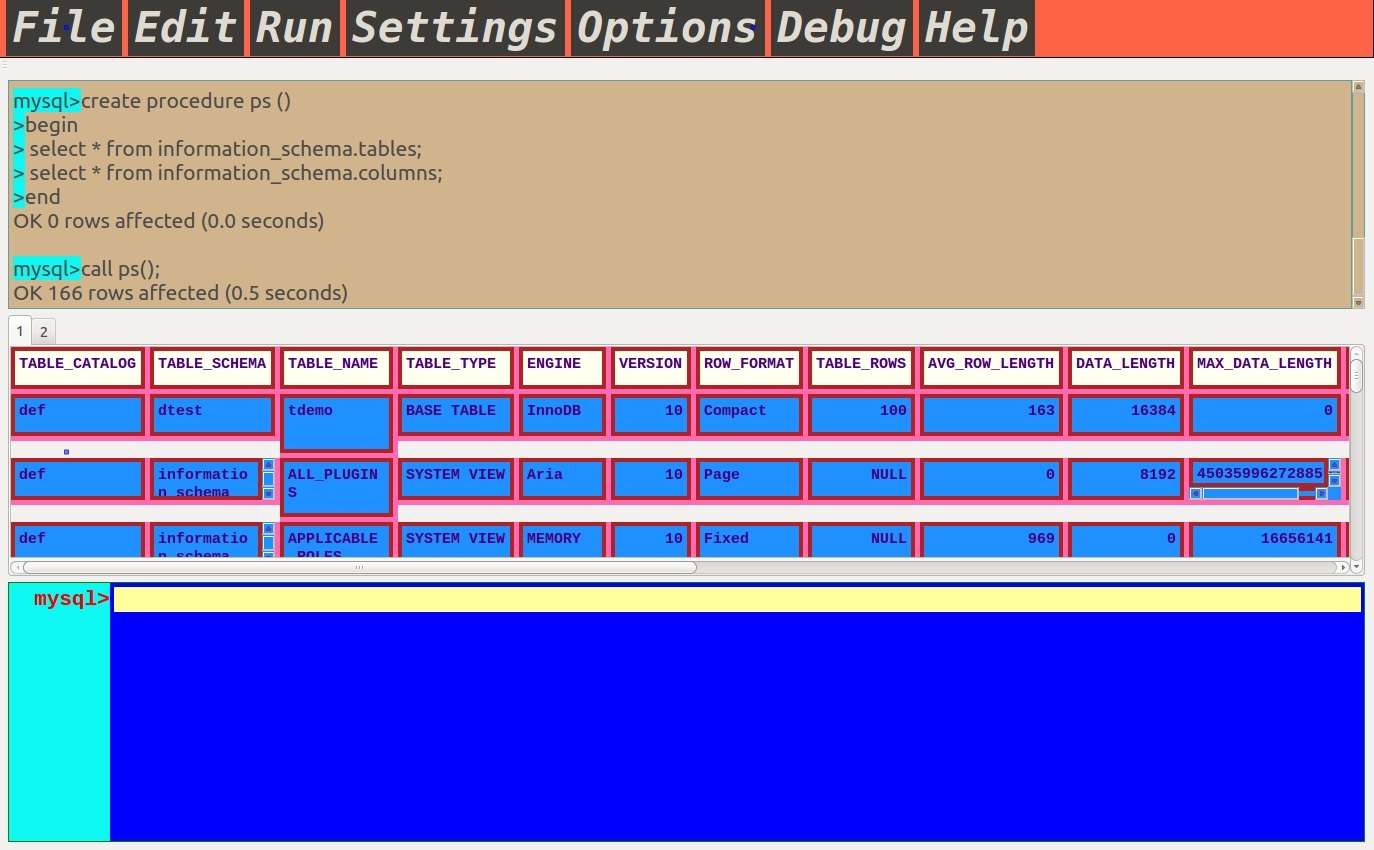
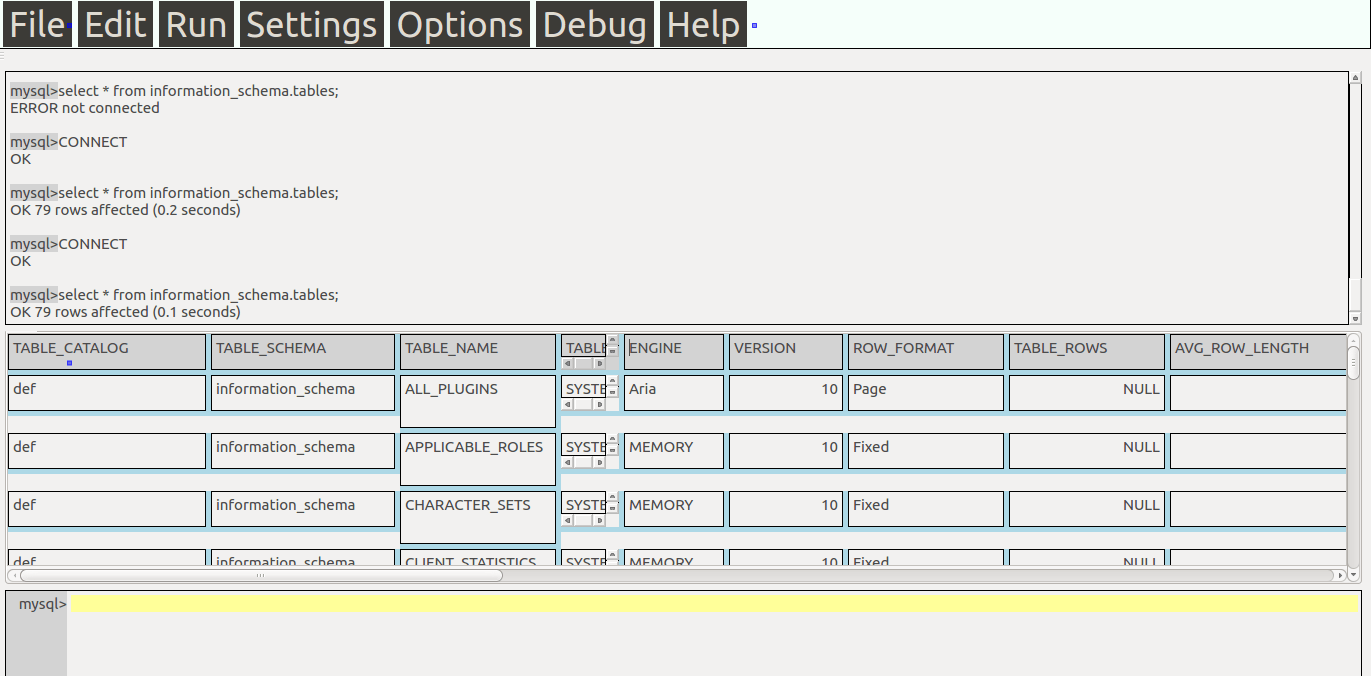
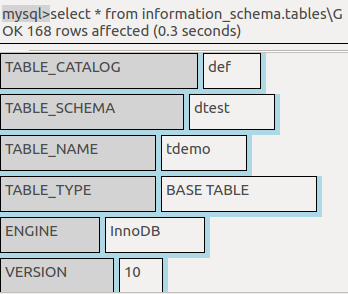
For example, this screenshot shows the whole screen after the
user has typed the statement "select * from information_schema.tables;"
on the statement widget and then executed it. The statement text
has been copied to the history widget, the statement widget has
been cleared, the result widget has the rows. The user has
dragged the border of the fourth column to the left, causing
a scroll bar to appear.
Menu
The menu at the top of the screen has File, Edit, Run, Settings, Options, Debug and Help.
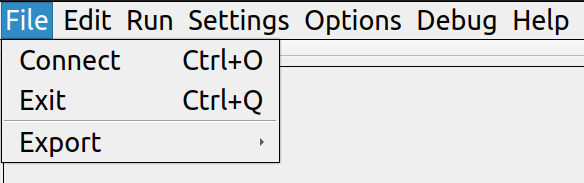 File|Connect, or Ctrl+O, starts the Connect dialog box.
File|Exit, or Ctrl+Q, stops the program.
File|Export brings up a dialog box for exporting selections.
File|Connect, or Ctrl+O, starts the Connect dialog box.
File|Exit, or Ctrl+Q, stops the program.
File|Export brings up a dialog box for exporting selections.
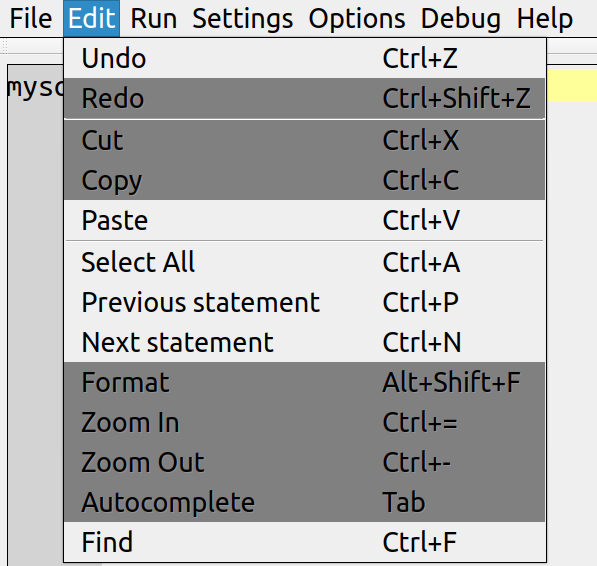 Edit|Undo or Ctrl+Z, Edit|Redo or Ctrl+Shift+Z, Edit|Cut or Ctrl+X,
Edit|Cut or Ctrl+X, Edit|Copy or Ctrl+C, Edit|Paste or Ctrl+V,
and Edit|Select or Ctrl+A, all work in the conventional manner.
Edit|Redo can only redo the last change.
Previous Statement or Ctrl+P and Next Statement or Ctrl+N will
copy earlier statements from the history widget into the statement
widget, so that they can be edited or re-executed with Run|Execute
or Ctrl+E.
Format or Alt+Shift+F changes what is in the statement
widget according to a simple style guide. Autocomplete or Tab will
be discussed later.
Edit|Undo or Ctrl+Z, Edit|Redo or Ctrl+Shift+Z, Edit|Cut or Ctrl+X,
Edit|Cut or Ctrl+X, Edit|Copy or Ctrl+C, Edit|Paste or Ctrl+V,
and Edit|Select or Ctrl+A, all work in the conventional manner.
Edit|Redo can only redo the last change.
Previous Statement or Ctrl+P and Next Statement or Ctrl+N will
copy earlier statements from the history widget into the statement
widget, so that they can be edited or re-executed with Run|Execute
or Ctrl+E.
Format or Alt+Shift+F changes what is in the statement
widget according to a simple style guide. Autocomplete or Tab will
be discussed later.
![]() Run|Execute or Ctrl+E or Ctrl+Enter causes execution of whatever is in the
statement widget.
Run|Kill or Ctrl+C tries to stop execution -- this
menu item is enabled only when a long-running statement
needs to be aborted by user intervention.
Run|Execute or Ctrl+E or Ctrl+Enter causes execution of whatever is in the
statement widget.
Run|Kill or Ctrl+C tries to stop execution -- this
menu item is enabled only when a long-running statement
needs to be aborted by user intervention.
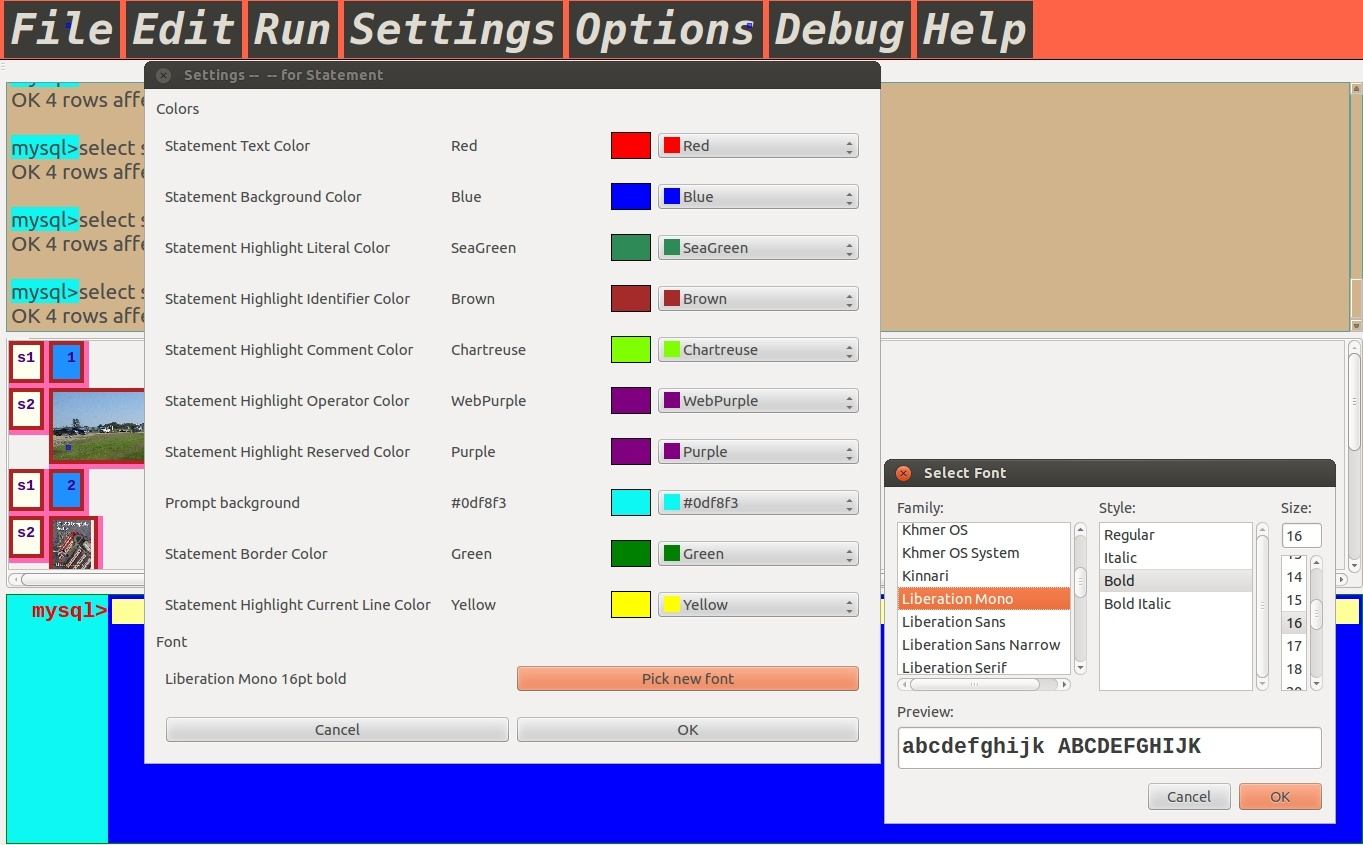
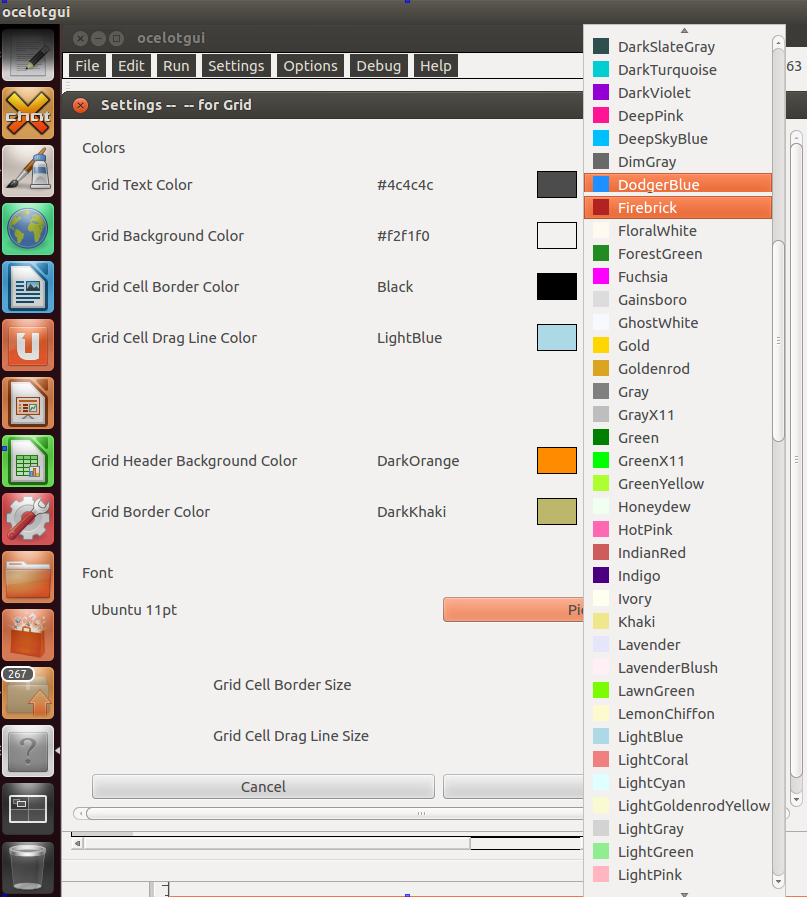
 Settings|Menu, Settings|History Widget, Settings|Grid Widget,
Settings|Statement, and Settings|Extra Rule 1 are
items which affect the behavior of each
individual widget. The color settings affect foregrounds,
backgrounds, borders, and (for the statement widget only)
the syntax highlights. The font settings affect font family,
boldness, italics, and size.
There may be additional choices affecting appearance,
for example the width of the border used to drag columns
in the result widget.
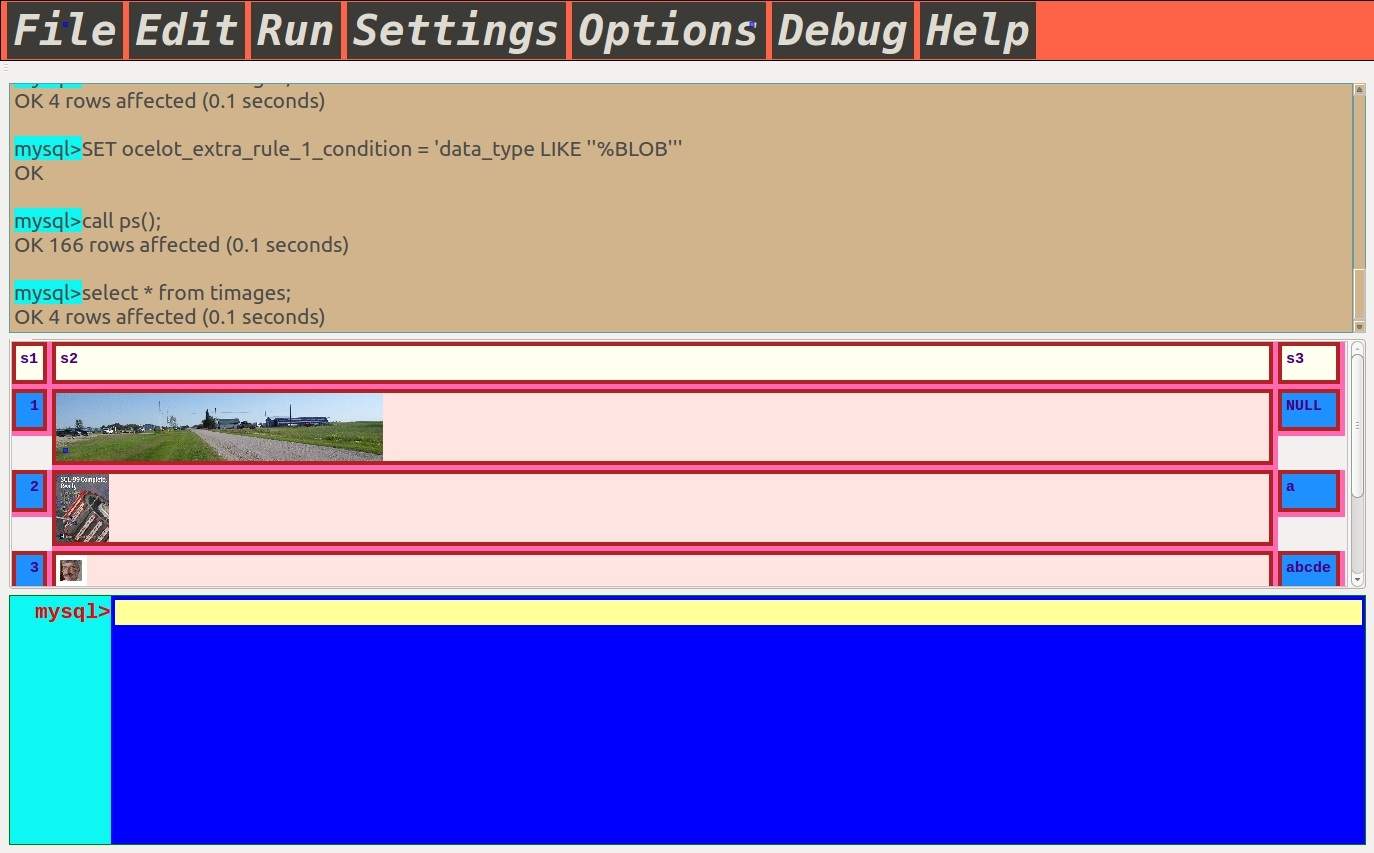
Settings|Extra Rule 1 is conditional -- for example, to specify
that BLOBs should be displayed as images on a pink background,
set Grid Background Color Pink, set Condition = data_type LIKE
'%BLOB', set Display As = image, then click OK.
Settings|Menu, Settings|History Widget, Settings|Grid Widget,
Settings|Statement, and Settings|Extra Rule 1 are
items which affect the behavior of each
individual widget. The color settings affect foregrounds,
backgrounds, borders, and (for the statement widget only)
the syntax highlights. The font settings affect font family,
boldness, italics, and size.
There may be additional choices affecting appearance,
for example the width of the border used to drag columns
in the result widget.
Settings|Extra Rule 1 is conditional -- for example, to specify
that BLOBs should be displayed as images on a pink background,
set Grid Background Color Pink, set Condition = data_type LIKE
'%BLOB', set Display As = image, then click OK.
 Options|detach history widget,
Options|detach result grid widget,
Options|detach debug widget are
for turning the respective widgets into independent windows,
so that they can be moved away from the statement widget,
or resized. A detached widget is always kept on top of the
other widgets in the application screen. When a widget is
already detached, the menu item text will change to "attached"
and clicking it will put the widget back in its original position.
Options|detach history widget,
Options|detach result grid widget,
Options|detach debug widget are
for turning the respective widgets into independent windows,
so that they can be moved away from the statement widget,
or resized. A detached widget is always kept on top of the
other widgets in the application screen. When a widget is
already detached, the menu item text will change to "attached"
and clicking it will put the widget back in its original position.
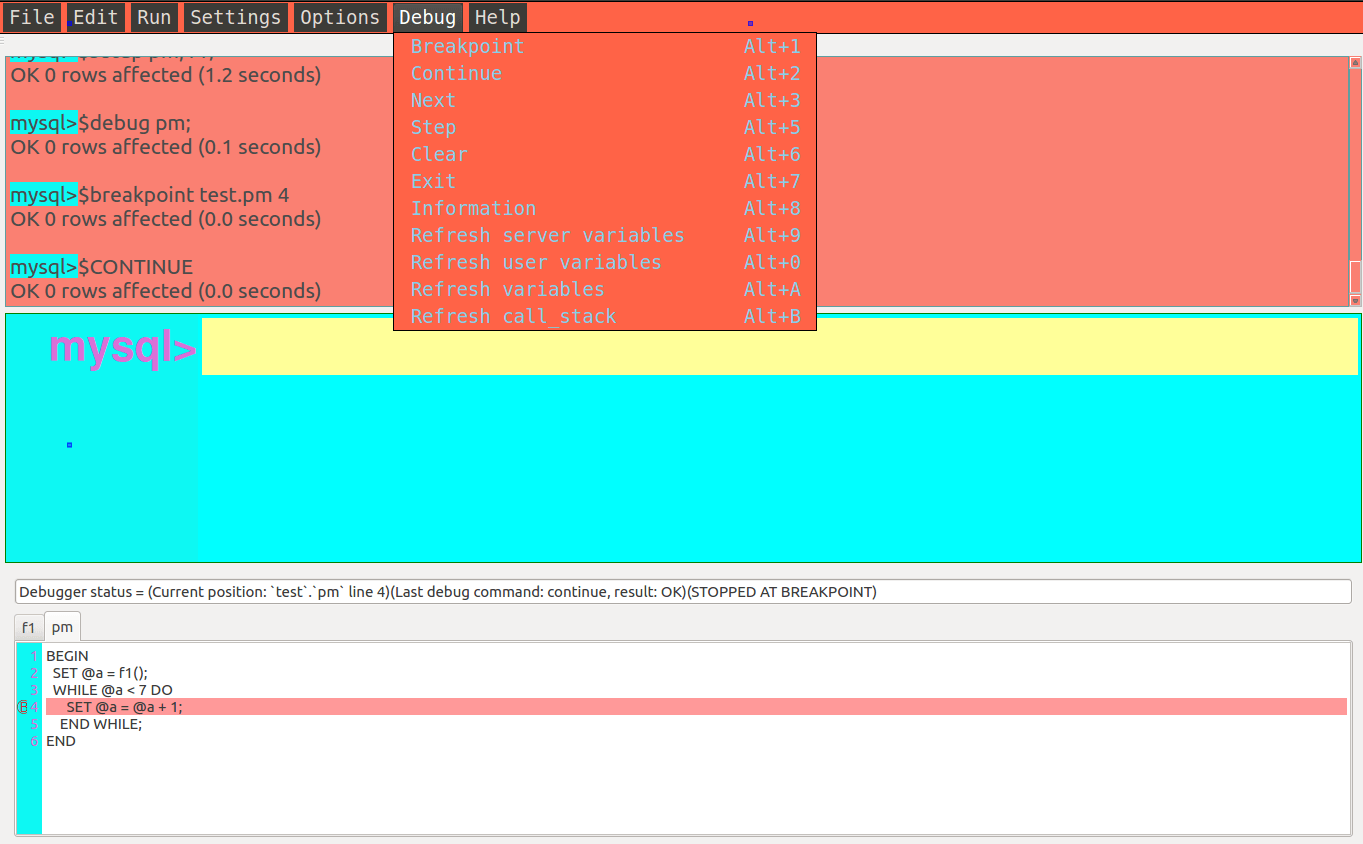
 The items on the Debug menu are enabled only when a debug session
is in progress. The way to debug SQL stored procedures or functions
will be explained in a later section.
The items on the Debug menu are enabled only when a debug session
is in progress. The way to debug SQL stored procedures or functions
will be explained in a later section.
 Help|About will show the license and copyright and version.
Help|The Manual will show the contents of README.md (the manual that you are reading) if README.md is on the same path as
the ocelotgui program; otherwise it will show a copyright, a GPL license, and a pointer to README.md.
Help|libmysqlclient will advise about finding and loading the libmysqlclient.so library.
Help|settings will advise about how to use the Settings menu items.
Help|About will show the license and copyright and version.
Help|The Manual will show the contents of README.md (the manual that you are reading) if README.md is on the same path as
the ocelotgui program; otherwise it will show a copyright, a GPL license, and a pointer to README.md.
Help|libmysqlclient will advise about finding and loading the libmysqlclient.so library.
Help|settings will advise about how to use the Settings menu items.
Debugger
It is possible to debug stored procedures and functions.
This version of ocelotgui incorporates MDBug
(read about MDBug at http://bazaar.launchpad.net/~hp-mdbug-team/mdbug/trunk/view/head:/debugger.txt).
All debugger instructions can be entered on the ocelotgui command line;
some operations can also be done via the Debug menu or by clicking on the stored-procedure display.
Currently-supported instructions are:
$install -- this is always the first thing to do.
$setup routine_name [, routine_name ...] -- prepares so '$debug routine_name' is possible.
$debug routine_name -- starts a debug session, shows routines in a tabbed widget.
$breakpoint routine_name line_number or Debug|breakpoint -- sets a breakpoint.
$clear routine_name line_number -- clears a breakpoint.
$next or Debug|Next -- goes to next executable line, without dropping into subroutines.
$step or Debug|Step -- goes to next executable line, will drop into subroutines.
$continue or Debug|Continue -- executes until breakpoint or until end of procedure.
$refresh breakpoints -- refreshes xxxmdbug.breakpoints table.
$refresh server_variables -- refreshes xxxmdbug.server_variables table.
$refresh variables -- refreshes xxxmdbug.variables table.
$refresh user_variables -- refreshes xxxmdbug.user_variables table.
$exit or Debug|Exit -- stops a debug session.
For a walk through a debugger example, with screenshots, see this blog post: http://ocelot.ca/blog/the-ocelotgui-debugger. For reference, read: Appendix 2 Reference for the ocelotgui debugger (ocelotgui)">.
Special Effects
 Vertical: If a user starts the program with ocelotgui --vertical=1
or ends a statement with backslash G, results come up with one column per row.
Vertical: If a user starts the program with ocelotgui --vertical=1
or ends a statement with backslash G, results come up with one column per row.
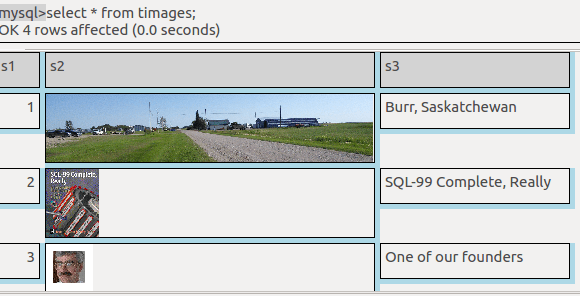 Images: If a user chooses Settings | Extra Rule 1 from the menu,
and sets the Condition and Display As boxes as described earlier,
and selects rows which contain LONGBLOB columns, and the column values are
images (such as PNG or JPEG or BMP or GIF format data), ocelotgui will display
the result as images.
Images: If a user chooses Settings | Extra Rule 1 from the menu,
and sets the Condition and Display As boxes as described earlier,
and selects rows which contain LONGBLOB columns, and the column values are
images (such as PNG or JPEG or BMP or GIF format data), ocelotgui will display
the result as images.
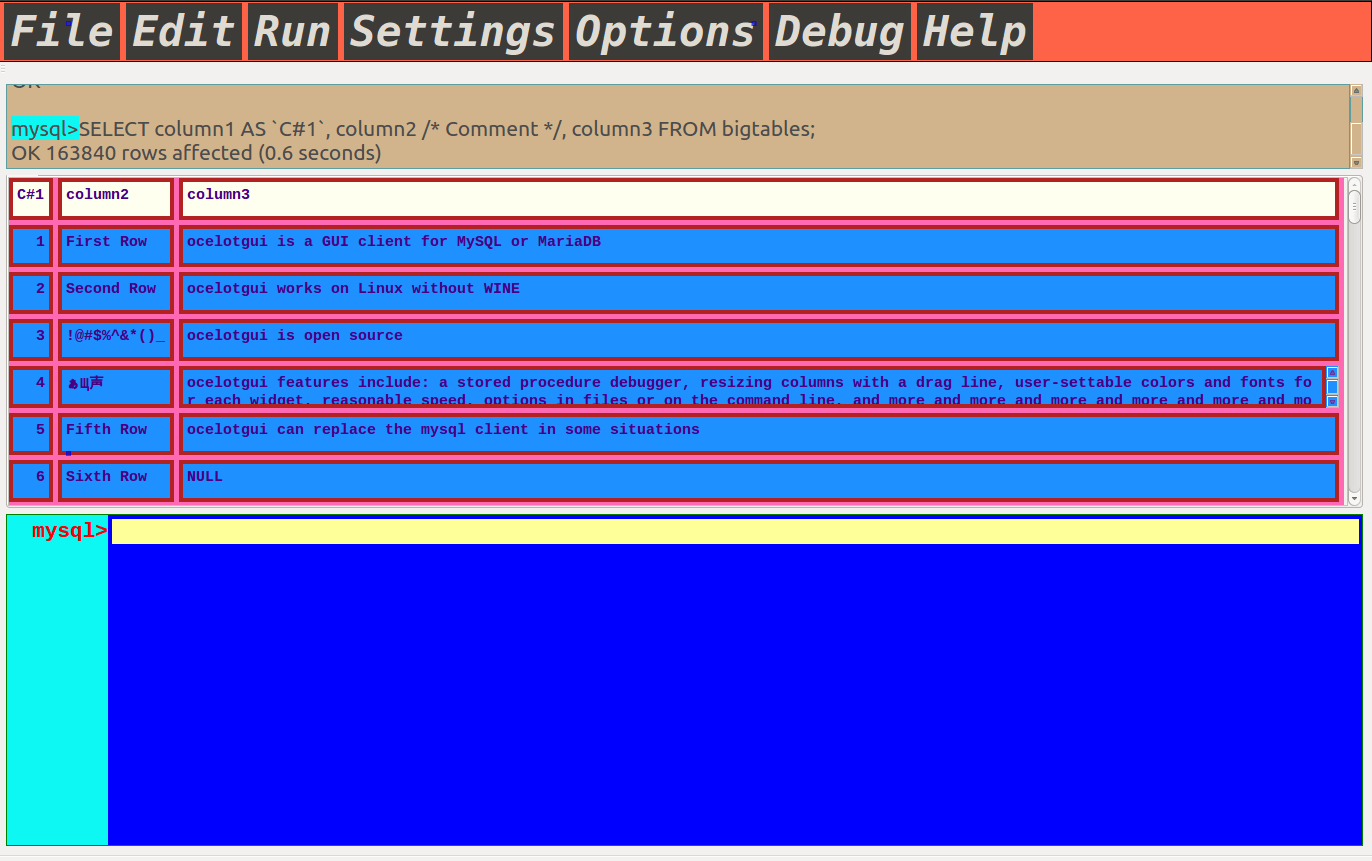
Result-set editing: If a user clicks on a column in the result set and makes a change, an update statement will appear in the statement widget. For example, if a result set is the result from SELECT column1, column2 FROM t;, and the column1 value is 5, and the column2 value is 'ABC', and the user changes the column2 value to 'AB', then the statement widget will show UPDATE t SET column2 = 'AB' WHERE column1 = 5 AND column2 = 'AB';. The user then has the choice of ignoring the update statement or executing it.
 Detaching: If a user chooses Options | detach history widget or
Options | detach result grid widget, then the widget will become a separate window
which can be moved or resized.
Detaching: If a user chooses Options | detach history widget or
Options | detach result grid widget, then the widget will become a separate window
which can be moved or resized.
 Colors: The Colors and fonts dialog boxes have a simple way to choose
colors, by selecting from a choice of 148 color names / color icons. Users can also
change colors by saying SET object_name_color = color-name | hex-rgb-value.
In fact ocelotgui mixes the modes: for example if a user chooses Settings | Grid Text Color,
then clicks on the 'Red' icon, then clicks OK, ocelotgui generates a
statement "SET ocelot_grid_text_color = 'Red';". This makes the instruction
easy to repeat or put in a script.
Colors: The Colors and fonts dialog boxes have a simple way to choose
colors, by selecting from a choice of 148 color names / color icons. Users can also
change colors by saying SET object_name_color = color-name | hex-rgb-value.
In fact ocelotgui mixes the modes: for example if a user chooses Settings | Grid Text Color,
then clicks on the 'Red' icon, then clicks OK, ocelotgui generates a
statement "SET ocelot_grid_text_color = 'Red';". This makes the instruction
easy to repeat or put in a script.
RE: SQL_MODE. To distinguish between literals and identifiers enclosed in double quotes, ocelotgui needs to know the value of sql_mode (ansi_quotes). It calculates this automatically; however, in rare circumstances it can fail to detect changes on the server. If that appears to be the case, say SET SESSION SQL_MODE = @@SESSION.SQL_MODE; to update it.
RE: AUTOCOMPLETION. While a user is entering an SQL statement,
ocelotgui will display a list of possible words that may follow.
Hitting the Tab key will cause the first word in the list to be
displayed and accepted.
Users can use arrow keys to select other words,
and can use "set ocelot_shortcut_autocomplete='...'; to choose a different key instead of the Tab key,
and can use "set ocelot_completer_timeout=...'; to choose how many seconds the list will be visible,
and can use "rehash;" to update the list.
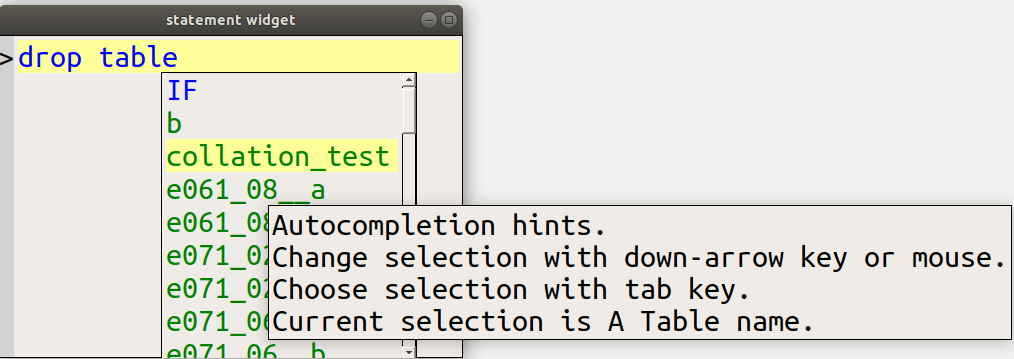
RE: HINTING FOR COLUMN NAMES. Although hints for syntax appear by default, hints for table / column identifiers might not. In order to make identifiers appear on the hint list: (1) ensure the setting for auto_rehash has not been turned off, and/or (2) enter the statement "REHASH;" to make the client ask the server for a list of identifiers in the current database; (3) when entering an SQL statement, type ` (backtick) at the point where an identifier is expected.
RE: FONT. By default, ocelotgui uses a fixed-pitch (mono) font that has similar attributes to whatever font was in use at the time it started. This may be a bad choice. We recommend trying out other fonts with the Settings menu for each widget.
RE: PERMANENT CUSTOMIZING. Changes to settings can be done with the Settings menu items, but such changes are not permanent. So note the commands that ocelotgui performs when settings are changed, and paste them into a file. Later this file can be executed (for example with SOURCE file-name), whenever ocelotgui is started again. Alternatively, settings can be placed in an options file such as my.cnf.
RE: CONDITIONAL SETTINGS. To override the ordinary settings
for result set displays there is a special SET statement with a WHERE clause:
SET ocelot_grid_setting = string|integer [, ocelot_grid_value = string-or-integer...]
WHERE condition [AND|OR condition ...];
where ocelot_grid_setting is OCELOT_GRID_BACKGROUND_COLOR | OCELOT_GRID_FONT_STYLE | etc.,
and condition has the form item comparison-operator literal, where
item is COLUMN_NAME | COLUMN_NUMBER | COLUMN_TYPE | ROW_NUMBER | VALUE,
and comparison-operator is = | > | >= | < | <= | <> | IS | REGEXP.
For example to say "I want the background color to be pink if
it's in the fourth column of the result set and it's NULL", say
SET ocelot_grid_background_color='pink' WHERE column_number = 4 AND value IS NULL;
RE: DEBUGGING WITH MYSQL 5.7. Oracle has made a significant incompatible behavior change in version 5.7, which affects the debugger. The originally recommended workaround was to say "set global show_compatibility_56=on;". We believe we made a more permanent fix for this problem in ocelotgui version 1.0.8.
RE: CONNECTION DIALOG. As stated earlier, if a password is necessary to connect, it is sufficient to start ocelotgui with "--password=password" or by choosing File|Connect and typing a password in the Password field (the sixth field in the Connection Dialog Box). Also on the Connection Dialog Box, if the server is running on the same computer as the ocelotgui client, it is sometimes a good idea to enter '127.0.0.1' in the host field, instead of 'localhost'.
RE: ROW NUMBERS. ocelotgui will replace the value 'row_number() over ()'
with the row number within the result set. For example, try
SELECT 'row_number() over ()' as r, table_name.* FROM table_name;
To disable this feature, start ocelotgui with --ocelot_client_side_functions=0.
RE: HOVERING. Use the mouse to hover over a word in the statement widget, and ocelotgui will display what kind of word it is, for example "table identifier".
RE: FORMAT. Click Edit|Format, and ocelotgui will change the contents of the statement widget so that keywords are upper case and sub-clauses or sub-statements are indented.
RE: HISTORY. By default the history does not contain any rows from result sets of previous statements. To change this, click Settings|History and enter a number for Max Row Count. Also users can change the history file name with HISTFILE=name, change what statements should not go to the ihstory file with HISTIGNORE=regexp, change whether the history file will include system-generated comments with OCELOT_HISTFILEFLAGS='L'|'LP', change how large the history file can become with OCELOT_HISTFILESIZE=number, change how large the initial history can become with OCELOT_HISTSIZE=number.
RE: EXPORT. A result set can be dumped to a file as text, as table, or as html.
RE: SHOW. There is a way to make SHOW (and similar statements like ANALYZE or CHECK or CHECKSUM or DESCRIBE or EXPLAIN or HELP) accept SELECT-style clauses and return SELECT-style result sets. Details are in the blog post Make SHOW as good as SELECT.
RE: TARANTOOL. By default ocelotgui is a client for MySQL or MariaDB. To use it as a client for Tarantool, read Appendix 3 Tarantool.
Explorer widget
EXPLORER NAME. Explorer. A similar feature in other GUI clients may be named "object explorer" or "navigator". Compare the name "Windows explorer".
EXPLORER SETTINGS.
To change some significant settings, click on the menu bar: Settings|Explorer.
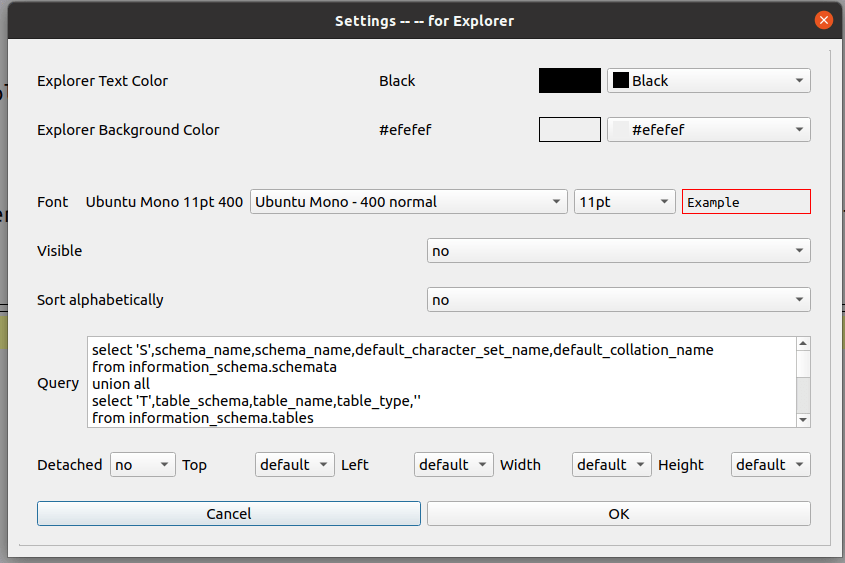 Visible: yes|no. Default no. So if you don't change this to 'yes', it is not visible.
There must be a connection to the DBMS server before it can be made visible.
Visible: yes|no. Default no. So if you don't change this to 'yes', it is not visible.
There must be a connection to the DBMS server before it can be made visible.
Sort alphabetically: yes|no. Default no. If 'yes', objects of the same type are sorted alphabetically.
Query: a long select with unions.
The default query selects all databases.
Users can change this query to add WHERE clauses (affects MySQL/MariaDB only).
Detached|Top|Left|Width|Height:
As with other widgets, the explorer is detachable and the explorer's size + position are settable
when it is detached.
Unlike with other widgets, changing width may have an effect even if the explorer is not detached.
The default width depends on the widths of the object names.
Ordinarily the explorer widget appears on the left while the other main widgets (history, grid, statement) appear vertically on the right.
EXPLORER STYLE. It is a result grid with text columns.
Therefore users get some features without needing to learn anything new:
* ^Find works. (if the item is visible)
* Vertical scroll bar works.
* Settings | Explorer can be used to change colors and font.
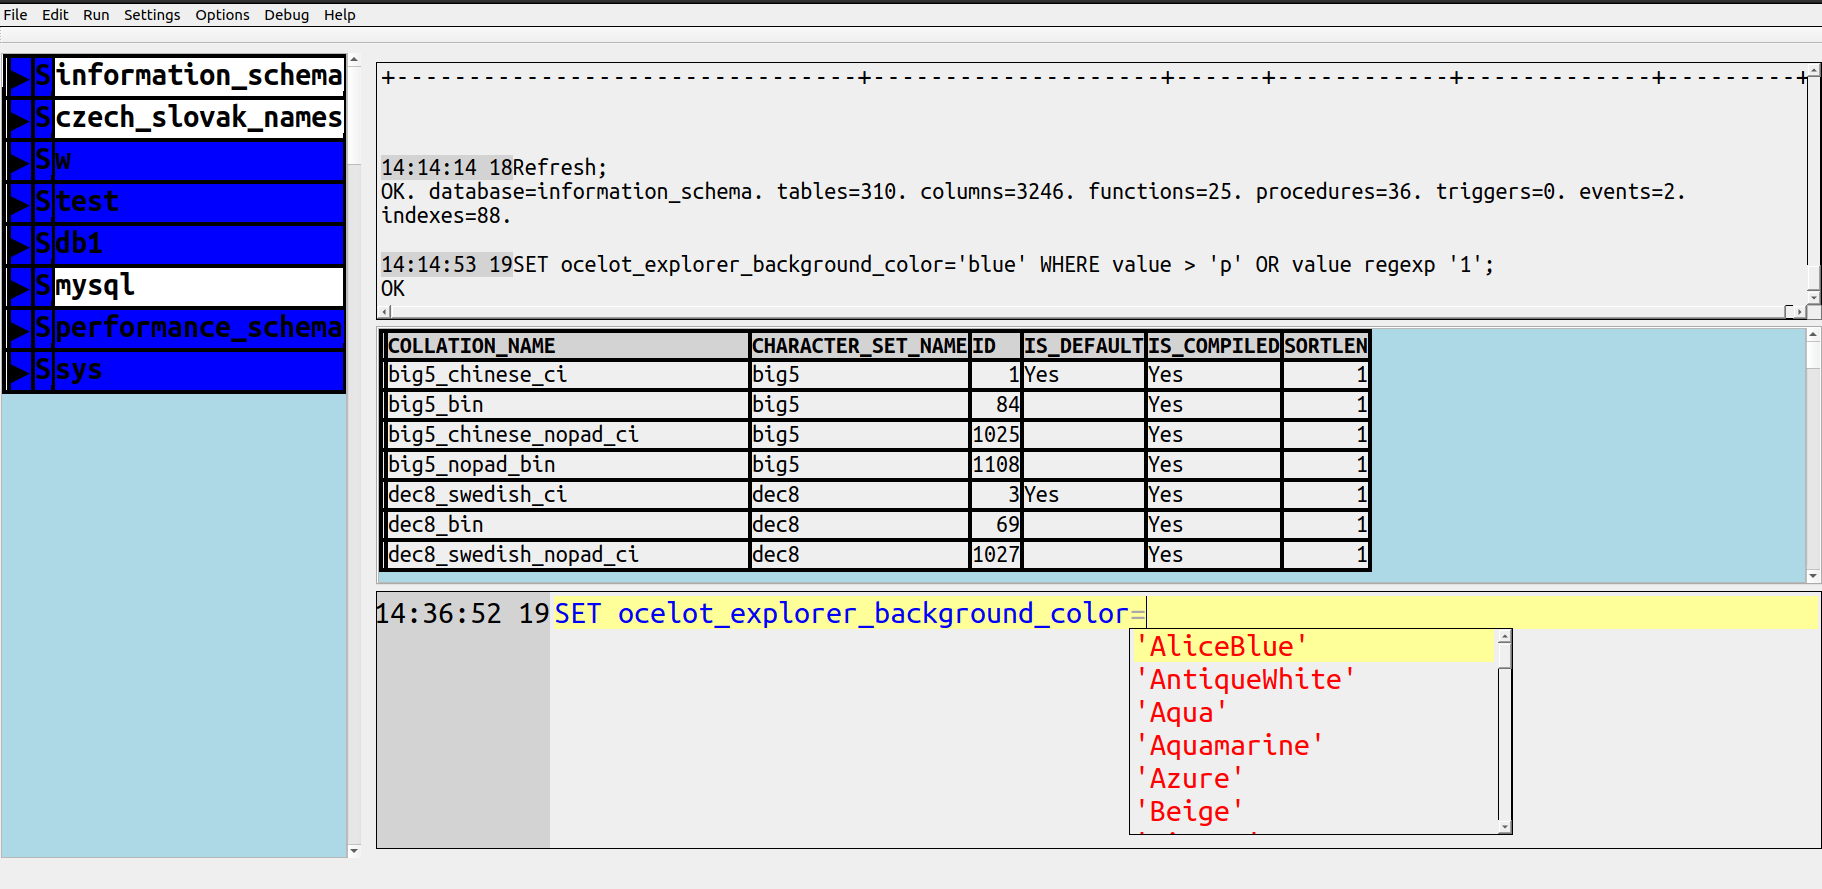
* Example: SET ocelot_explorer_text_color='blue' WHERE value = '▶'; REFRESH;
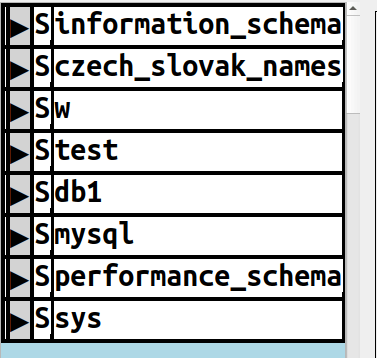
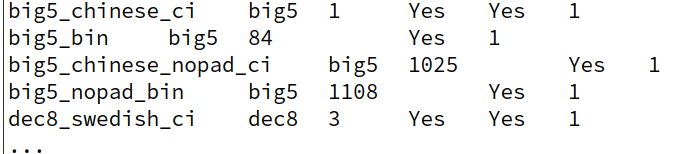
EXPLORER COLUMNS. There are three text columns.
#1: Min. = Unicode Black Down-Pointing Triangle ▼ or Black Right-Pointing Triangle ▶ if database or table.
If it's a database or table, click on the triangle to hide the parts e.g. columns, or to show them again.
(This is "toggling".)
It's treated as a header item, that is, Result Grid Settings for header affect it.
So ordinarily it has a different background color.
#2: object_type. = S or T or V or C or P or I or E or t
#3: object_name. for example, if object_type='T', this is a table name.
If object_type='C', this is a column name and is taken from part_name.
EXPLORER ROWS. Rows are in a hierarchy: S, T or V, C or I, etc. Within the hierarchy, rows are in order by creation time.
EXPLORER POSSIBLE USER ACTIONS
Hover. This will show what type of object is under the cursor and contain some short advice.
DoubleClick: This will copy the cell contents to the end of the statement widget
Right Click: puts up a context menu.
Click on the leftmost (Min) column. This will "toggle".
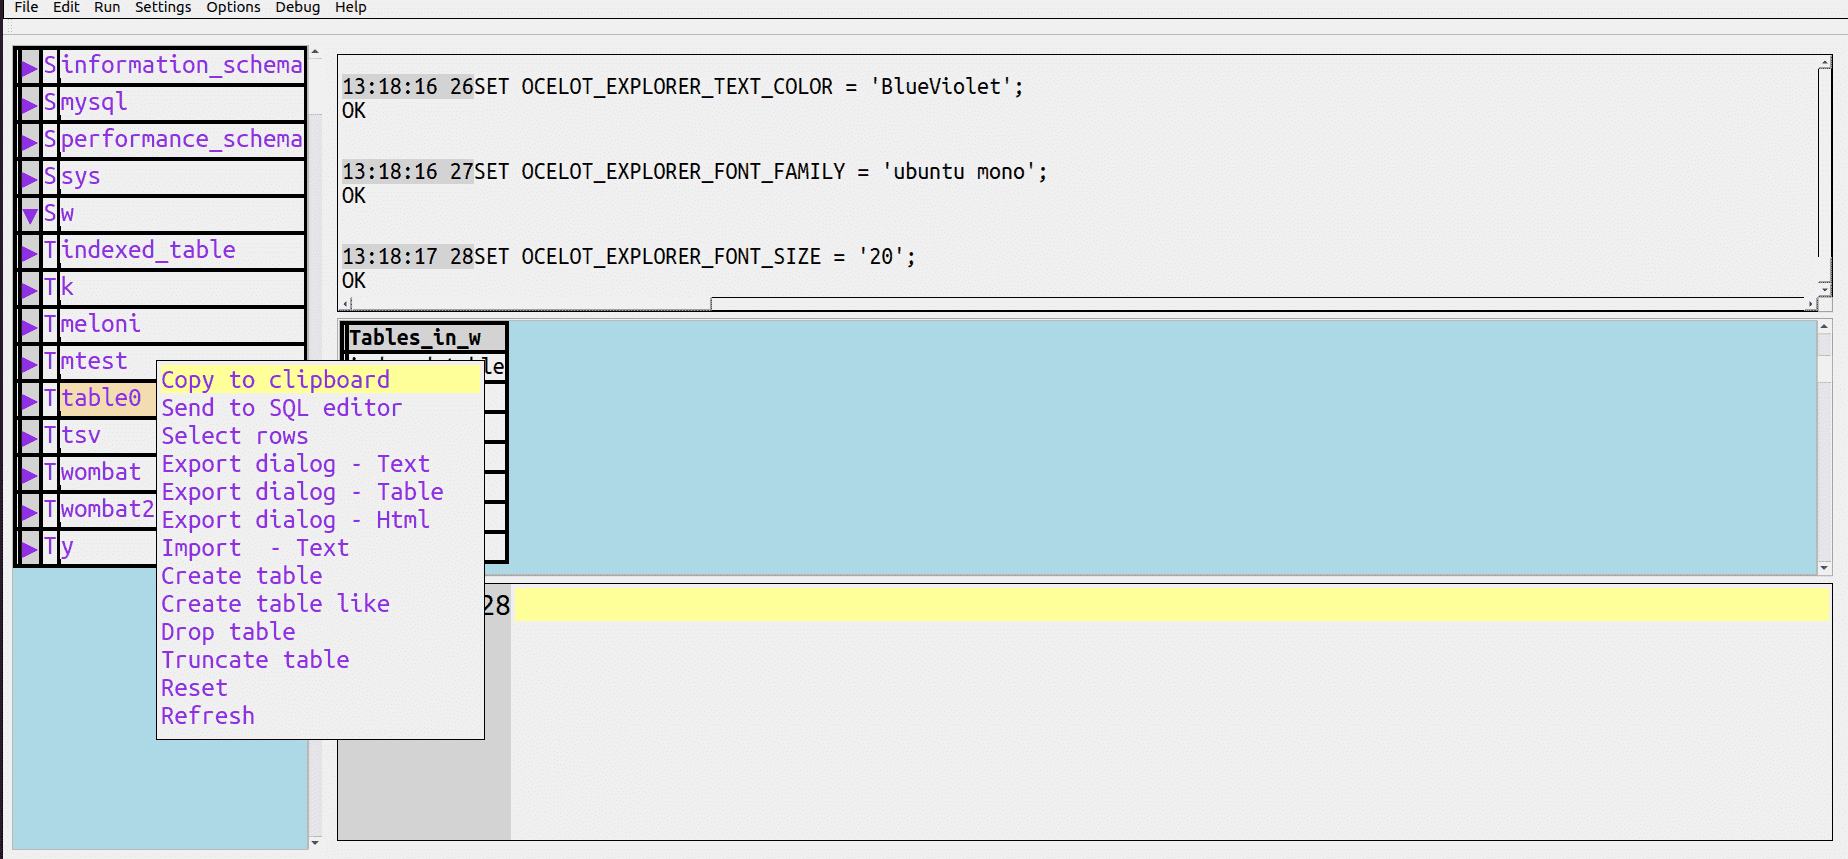
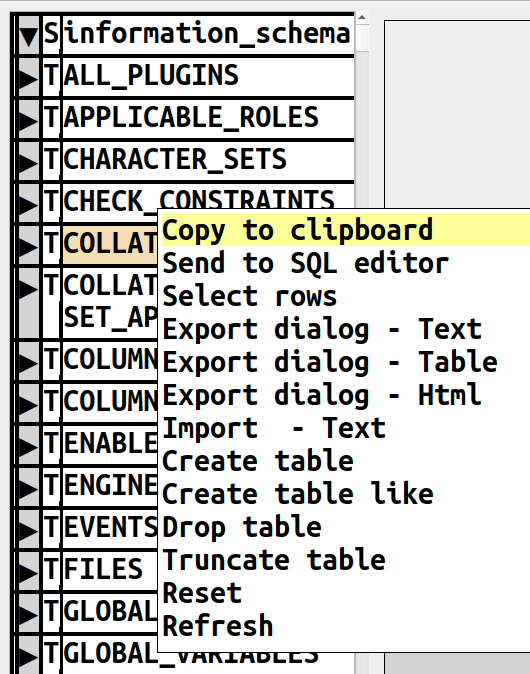
EXPLORER CONTEXT MENU.
This is the menu that will appear when the user uses the right mouse button to click
over a row in the explorer display.
It is called a context menu because the menu is different for each object type.
For example if it's over a table, then table-related menu items will appear.
Items for all types: Copy to clipboard, Send to SQL editor, Reset, Refresh.
Items for 'S' (Schema): Set as default schema, Filter to this schema, Schema inspector,
Create schema, Alter schema, Drop schema.
Items for 'T' (Table): Select rows, Export dialog - Text, Export dialog - Table,
Export dialog - Html, Import - Text, Create table, Create table like, Drop table, Truncate table.
For 'C' (Column): Show column, Drop column.
For 'I' (Index): Show index, Select index, drop index.
For 'P' (Procedure): Create procedure, Drop procedure.
Details for 'T':
  Copy to Clipboard      Equivalent of "Copy"
  Send to SQL editor     Copy, then put in statement widget, then execute
  Select rows            Execute a statement to select 100 rows
  Export Dialog - Text   Dialog box for export, then do the export if OK
  Export Dialog - Table  Dialog box for export, then do the export if OK
  Export Dialog - Html   Dialog box for export, then do the export if OK
  Import - Text          Generate INSERTs for a file's contents, no options
  Create table           Generate SHOW CREATE TABLE ...
  Create table like      Generate CREATE TABLE ... LIKE ...
  Drop table             Generate DROP TABLE
  Truncate table         Generate TRUNCATE TABLE
  Reset                  Back to default state with nothing expanded
  Refresh                Big SELECT to recreate the widget (this can be slow)
EXPLORER EXAMPLE.
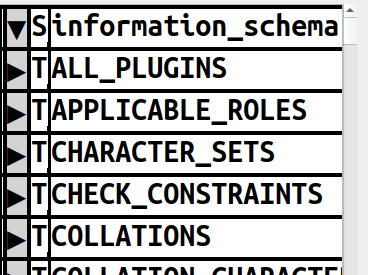
The user makes the explorer visible with Settings|Explorer Widget, it looks like this:
The user clicks the ▶ beside information_schema, it changes to ▼
and the schema items appear:
The user right-clicks on COLLATIONS, and the context menu appears:
The user navigates (with the mouse or the down-arrow key) and selects
(with Enter or Tab or click) the Export dialog - Text choice, and
the export dialog appears:
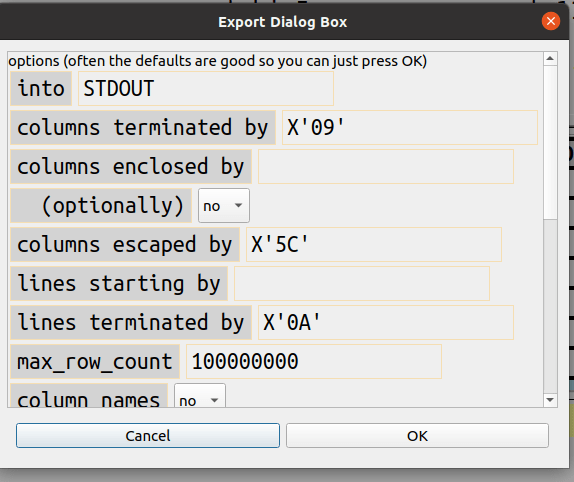
The user selects the OK button and the contents are dumped to STDOUT:
EXPLORER SET STATEMENTS.
The user can enter SET statements on the select widget.
Or, some SET statements will be generated when the user clicks OK on the Settings menu.
Keywords are
OCELOT_EXPLORER_ACTION,
OCELOT_EXPLORER_APPLICABLE_DBMSS,
OCELOT_EXPLORER_APPLICABLE_TYPES,
OCELOT_EXPLORER_BACKGROUND_COLOR,
OCELOT_EXPLORER_DETACHED,
OCELOT_EXPLORER_ENABLED,
OCELOT_EXPLORER_FONT_FAMILY,
OCELOT_EXPLORER_FONT_SIZE,
OCELOT_EXPLORER_FONT_STYLE,
OCELOT_EXPLORER_FONT_WEIGHT,
OCELOT_EXPLORER_HEIGHT,
OCELOT_EXPLORER_LEFT,
OCELOT_EXPLORER_SHORTCUT,
OCELOT_EXPLORER_TEXT,
OCELOT_EXPLORER_TEXT_COLOR,
OCELOT_EXPLORER_TOP,
OCELOT_EXPLORER_VISIBLE,
OCELOT_EXPLORER_WIDTH.
The important one is SET ocelot_explorer_visible='yes';
Settings can also be done in the .cnf file or the command line,
for example start ocelotgui with --ocelot_explorer_visible='yes'.
Such statements affect both the explorer widget and its context menu.
Note: some settings changes do not take effect immediately, they are delayed until "Refresh" happens.
EXPLORER CONDITIONAL SET STATEMENTS.
There is an optional clause ... WHERE VALUE operator 'literal' [{AND|OR} value operator 'literal' ...].
Statements with WHERE clauses affect only rows which match the expression.
Example:
SET ocelot_explorer_background_color='blue' WHERE value > 'p' OR value regexp '1';
EXPLORER REFRESH STATEMENT. REFRESH is a bit similar to REHASH, but it gets all schemas (databases) -- so has an effect on the server. REFRESH is necessary because we don't know when other users might change data definitions. And it's slow. Whenever users say REFRESH, the explorer tables are redone.
EXPLORER IN OPTIONS MENU. Choosing Options|Detach explorer widget,
and rearranging widgets, could result in something like this:

EXPLORER ADVANCED-LEVEL CUSTOMIZING.
As explained earlier, customizing the appearance of the explorer widget
and the context menu, or specific rows on them, is simple
and somewhat like the customizing of the other widgets.
However, one can do more with the context menu -- change the text and
action and shortcut.
Here, for example, is a statement that says
there will be a shortcut associated with the Refresh option:
SET ocelot_explorer_shortcut='Alt+G' WHERE value = 'Refresh';
Here, for example, is a statement that says
"Instead of 'Create table', the 'T' menu choice will be
'Select Count(*)' and the effect, if you click it,
or type the shortcut key, will be that the
statement "SELECT COUNT(*) FROM (table-name-in-context);" will appear on the statement widget,
where it is executed, so the result count appears in the grid widget.
SET ocelot_explorer_action='SELECT COUNT(*) FROM ${object_name};',
ocelot_explorer_text='Customized Selection'
WHERE value = 'Create table';
In other words, users can write their own explorer widgets.
Many of the possible actions can have "macros"
-- strings enclosed inside ${...} that will be replaced when the statement is executed.
Some macros are:
... ${dialog-table} ${dialog_file} ${occurs_text} ${schema_name} ${object_name}
'${object_name}' ${part_name} ${unqualified_part_name} '${part_name}'
${part_type} ${cell} ${clipboard} ${action}.
Since ocelotgui source code is supplied, users can
download it and see the exact effects by reading the C++ statements in program ocelotgui.cpp,
function Context_menu::replacer().
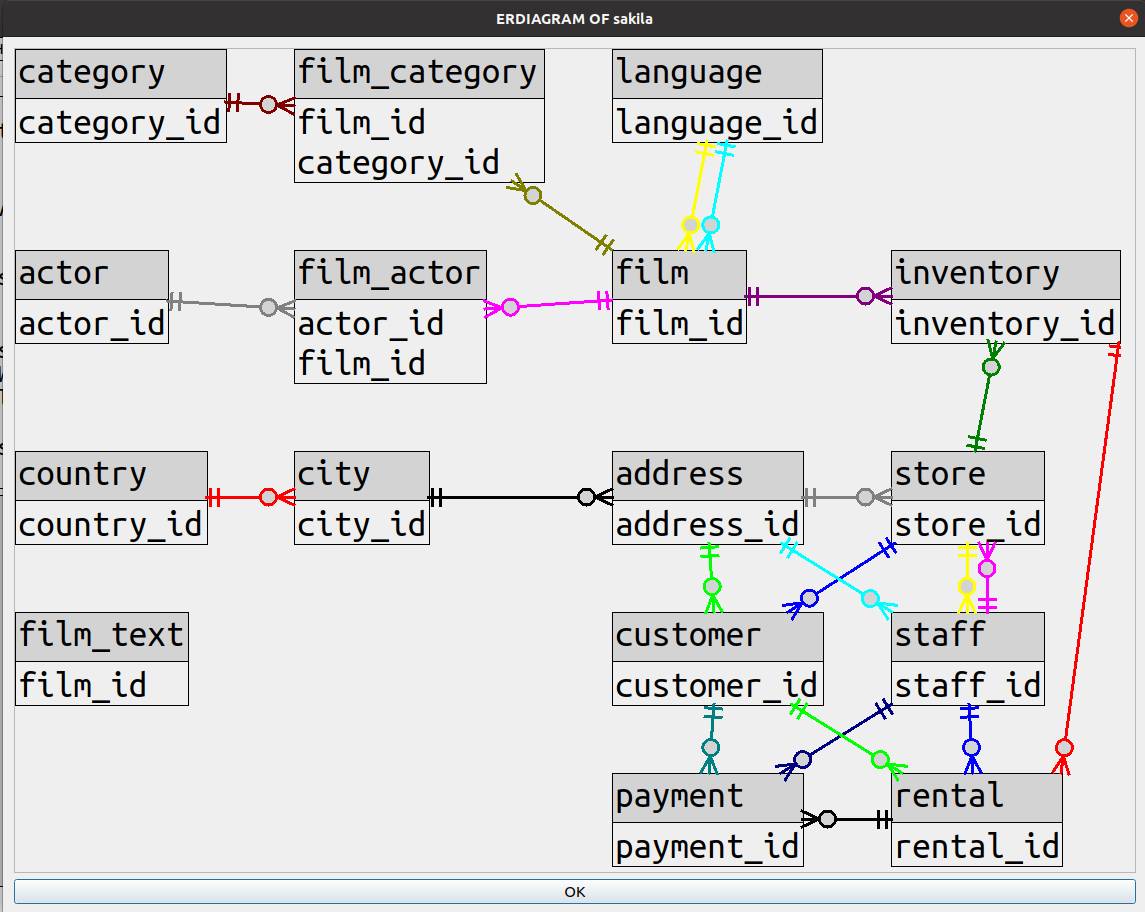
ERDiagram
An entity relationship diagram ("ERDiagram") is a graphic display of tables (in rectangles) and foreign-key relationships
(as lines). The prerequisite is the existence of an explorer widget, that is,
SET ocelot_explorer_visible='yes';
is necessary before requesting an ERDiagram.
An ERDiagram may either be requested from the explorer or from the statement widget.
When it's requested from the statement widget, the syntax is:
SET OCELOT_QUERY = SHOW ERDIAGRAM OF schema_name [COLUMNS PRIMARY] [LINES IN BACKGROUND] [TABLES (table-list];
For example, to get the picture shown here, if you have the well-known "sakila" database, say
SET OCELOT_QUERY = SHOW ERDIAGRAM OF sakila COLUMNS PRIMARY;
The optional clause COLUMNS PRIMARY means "show only the columns which are part of a primary key instead of all columns", the optional clause LINES IN BACKGROUND means "draw lines underneath tables instead of over them", the optional clause TABLES (table-list) means "show only the tables in this list instead of all tables". The table list should be a comma-delimited list of table names and each name can be followed by x and y coordinates, for example "TABLES (customer 0 1, address 1 1" means "display customer in column 0 row 1 and display address in column 1 row 1".
Customize the display fonts and colors with SET OCELOT_GRID_... statements, for example SET OCELOT_GRID_FONT_WEIGHT='bold' WHERE value REGEXP '_id'; will cause column names which end with _id (the primary keys) to be displayed with a bold font. Move a mouse over a line to see the foreign key name.
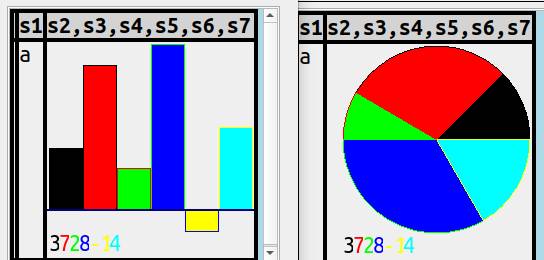
Charts
While a result set is visible, if some columns are numeric, press Alt+Shift+B to
display as a bar chart, Alt+Shift+P to display as a pie chart, Alt+Shift+L to display as a line chart.
No plugins or separate programs are necessary.
But to customize the look of the charts, you will need client statements.
The basic statement syntax is
SET ocelot_grid_chart = 'literal' [WHERE clause];
After you've typed SET ocelot_grid_chart = the prompt/autocomplete list wil be
BAR | LINE | PIE | BAR VERTICAL | BAR STACKED | BAR VERTICAL STACKED | BAR SUBGROUP BY VALUE % 3
| BAR SUBGROUP BY LEFT(COLUMN_NAME, 2) | LINE SUBGROUP BY LEFT(COLUMN_NAME, 2) | PIE SUBGROUP BY LEFT(COLUMN_NAME, 2) | [string]
-- and you can make your own combination for example
SET ocelot_grid_chart = 'BAR STACKED SUBGROUP BY VALUE % 5';
The optional WHERE may include COLUMN_NAME | COLUMN_NUMBER | COLUMN_TYPE
(relational operator) (literal value), along with AND|OR, as is usual for
any SET OCELOT_GRID_... statements. For example
SET OCELOT_GRID_chart = 'PIE' WHERE column_name = 'k';
SET ocelot_grid_chart=''; will cancel all previous uses of SET ocelot_chart_grid,
that is, it turns the feature off.
Shortcut key combinations are:
Alt+Shift+B causes SET ocelot_grid_chart='bar';
Alt+Shift+L causes SET ocelot_grid_chart='line';
Alt_Shift+P causes SET ocelot_grid_chart='pie';
Alt+Shift+N causes SET ocelot_grid_chart='';
As usual, it is possible to change the key combinations with
SET ocelot_shortcut... statements.
GROUPS: Charts make sense when representing numbers.
A "group" is any uninterrupted series of numbers in a result-set row.
For example, in
SELECT 'a',1,2,3.7,4,'b',5e1,6,'c';
the first group is 1,2,3.7,4 and the second group is 5e1,6.
(That is the default. to change the default, use a WHERE clause.)
SUBGROUPS. A group may be divided into subgroups.
Subgrouping is what decides how sampling is done within a group.
Different methods of subgrouping are appropriate for different
types of chart.
There is automatic subgrouping of pies because otherwise all
pie segments would have a single colour.
(Different subgroups have different colours.)
There is automatic subgrouping of lines because otherwise the
points of all lines would be in the same axis and there would
be no apparent movement. The automatic subgrouping in this case
is SUBGROUP BY LEFT(COLUMN_NAME,2) so it need not be specified.
LAYOUT OF A CELL. (After header, not including cell border.)
  +--------------------------------------------------+
  |    TOP                                           |
  |L |                                              L|
  |E |   CANVAS                                     E|
  |F |                                              G|
  |T |                                              E|
  |  |                                              N|
  |  |                                              D|
  |   _____________________________________________  |
  |   BOTTOM                                         |
  +--------------------------------------------------+
But if cell size is small ocelotgui might cancel everything except the canvas.
CANVAS: is a non-optional component, it has the actual bar/line/pie chart.
LEGEND: is on the RIGHT. Icons and very short text.
TOP: text (not shown by default).
LEFT: For vertical-bar or line has "values axis", for horizontal-bar has "samples axis". Text, rotated 90 degrees.
LEFT LINE: a straight line between LEFT and canvas.
BOTTOM: For horizontal-bar or line has "values axis", for vertical-bar has "samples axis". Text.
BOTTOM LINE: a straight line between canvas and BOTTOM.
Values axis: Becomes next to LEFT or BOTTOM in a bar or line.
Samples axis: Becomes next to LEFT or BOTTOM in a bar or line.
It is possible to cancel or change any item except the canvas. So a fuller statement of the SET syntax can be
  SET ocelot_grid_chart = '
  {BAR|LINE|PIE}          currently default=bar if this is missing, but don't do it
  [VERTICAL]                        default is horizontal
  [STACKED]                         default is grouping
  [TOP=value]                       default is null
  [RIGHT=value|LEGEND|NULL]         default is LEGEND
  [LEFT=value|DEFAULT|NULL]         default is DEFAULT
  [BOTTOM=value|DEFAULT|NULL]       default is DEFAULT
  [AXIS=NULL|ALL]                   default is ALL, anything but NULL will make axes appear
                         '
  WHERE condition];
For example, to suppress everything except the canvas with a vertical bar chart:SET ocelot_grid_chart='BAR VERTICAL RIGHT=NULL LEFT=NULL BOTTOM=NULL AXIS=NULL';
For example, to add a top line along with the other components with a pie:
SET ocelot_grid_chart='PIE TOP=TOPPER';
EFFECTS OF OTHER SETTINGS:
SET ocelot_grid_font=... affects what font the text items have.
SET ocelot_grid_cell_border_size=... affects the width of lines.
And other ocelot_grid settings may affect all cells including cells with charts.
Any item value might be truncated. An easy way to change width of a single chart
is to use long column names, that is, instead of saying SELECT 1, 2, 3; say
SELECT 1 AS really_long_column_name, 2, 3;
but for some charts it is possible to use "SET ocelot_grid_cell_width=..." instead.
ILLUSTRATIONS. Pictures showing effects are in a blog post: Charts. The current output may look slightly different from the illustrations there, and the Qwt library is no longer necessary.
Make your own menus
There are SQL-like statements for manipulating the main menus. They all begin with SET ocelot_query =, and they are all client statements. You can execute them without being connected to a DBMS server.
SET ocelot_query =
  SELECT * FROM menus;
SET ocelot_query =
  DELETE FROM menus WHERE id = 'id';
SET ocelot_query =
  UPDATE menus SET menuitem | shortcut | action = 'literal' WHERE id = 'id';
SET ocelot_query =
  INSERT INTO menus VALUES ('id', 'menu-title', 'menu-item', 'action');
SELECT result columns are ID (a unique value which you need to know for the WHERE clause in other menu statements), MENU_TITLE (the name of a menu), MENU_ITEM (the name of a menu item within a menu), ACTION (what happens when you select a menu item), SHORTCUT (a keysequence that does the same thing as selecting the menu item). Initially the ACTION column will have "[menu]" for a menu, "[separator]" for a line that sometimes is drawn between menu items, and function names for every menu item. (You would see the same function names if you looked at the ocelotgui source code.)
Suppose you want to remove the File|Exit menu item. You would first use SELECT to see that the ID is action_file_exit. Then SET ocelot_query = DELETE FROM menus WHERE id = 'action_file_exit'; will remove it. But you could put it back later with SET ocelot_query = INSERT INTO menus VALUES ('action_file_exit', 'File', 'Exit', 'action_file_exit');.
Suppose you want to change the Edit|Cut menu item to Edit|Couper. You would first use SELECT to find that the ID is action_edit_cut. Then SET ocelot_query = UPDATE menus SET menu_item = 'Couper' WHERE id = 'action_edit_cut'; will change it. Then you can change the shortcut, with SET ocelot_query = UPDATE menus SET shortcut = 'Ctrl+Shift+X' WHERE id = 'action_edit_cut'; as described earlier.
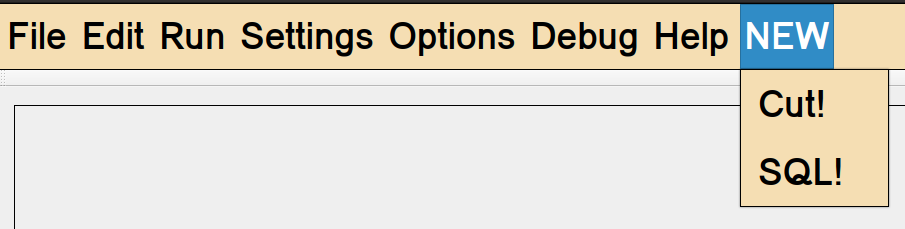
Suppose you want to make a completely new menu with your own names and actions.
You don't need to insert a "[menu]" row, that will happen automatically when you insert a menu item.
So SET ocelot_query = INSERT INTO menus VALUES ('new_cut', 'NEW', 'Cut!', 'action_edit_cut'); will
make a new menu and a new menu item NEW|Cut! with an action that does the same thing as Edit|cut.
Then SET ocelot_query = INSERT INTO menus VALUES ('new_sql', 'NEW', 'SQL!', 'SELECT 5 AS five, 6 AS six UNION ALL SELECT 5, 6;'); will make a new menu item NEW|SQL! that causes an SQL statement.
So now the menu looks like this:
So whenever you have stock SQL statements, or a series of SQL statements, that you might want to
repeat frequently, you don't have to store them in a file and read the file with SOURCE. You can
have them in the menu. Just remember: they must end with a semicolon.
You can also make a menu whose action is a plugin. Plugins are described in the next section.
Make your own plugins
A plugin is a routine in a library. There are SQL-like statements for manipulating the plugins. They all begin with SET ocelot_query =, and they are all client statements. You can execute them without being connected to a DBMS server.
SET ocelot_query =
  SELECT * FROM plugins;
SET ocelot_query =
  DELETE FROM plugins WHERE action = 'action';
SET ocelot_query =
  INSERT INTO plugins VALUES ('library', 'action');
... where ACTION is the name of the routine in the library.
What the routine does is up to you, you have to write it, in C or C++.
The description here is only about the SQL-like statements.
Again, SELECT is useful for seeing what plugins have been inserted, and DELETE is useful for undoing.
The INSERT will cause ocelotgui to search for a library (called a .so with Linux or a .dll with Windows),
and within that to search for a routine. There are two kinds of plugins: "trigger plugins" and "menu plugins".
When ocelotgui reaches one of a certain set of preset points in its code, it calls a trigger plugin with a structured parameter that contains a lot of information about state, values of current variables, and permanent settings. The trigger plugin can act on the information, and in some cases can change it. For example, ocelotgui can call a trigger plugin whenever it is about to pass an SQL statement to the server, and the plugin can log the request then change the SQL statement to something completely different.
When a menu item has an action that is not one of the 'action_*' routines within the ocelotgui code, and is not an SQL statement ending with ';', it looks for a menu plugin and calls it. For example, after SET ocelot_query = INSERT INTO plugins VALUES ('/home/pgulutzan/plugin/libplugin.so', 'menu_action'); and after SET ocelot_query = INSERT INTO menus VALUES ('menu_action', 'NEW', 'The Example', 'menu_action'); and after SET ocelot_query = UPDATE menus SET shortcut = 'Shift+F12' WHERE id = 'menu_action'; and after the user either clicks the NEW/The Example menu item or types Shift+F12, the menu_action function in libplugin.so will run.
This is not a manual about C/C++ coding so the rest is up to you. But to make it as simple as possible, ocelotgui is packaged with a file named plugin.c. It contains several example functions and several hundred words of commentary.
Contact
We need feedback!
Registered github users can simply go to https://github.com/ocelot-inc/ocelotgui and click the "Star" button.
Send bug reports and feature requests to https://github.com/ocelot-inc/ocelotgui/issues. Or send a private note to pgulutzan at ocelot.ca.
There may be announcements from time to time on Ocelot's web page (ocelot.ca) or on the employee blog (http://ocelot.ca/blog).
Any contributions will be appreciated.
Appendix 1 Details about ocelotgui options
An option is a named value which affects connecting and behavior. Most [ocelot] options are very similar to options of the mysql client.
The places that an option might be specified are: within the program for example the default port value is 3306, in an environment variable for example "export MYSQL_TCP_PORT=3306", in a configuration file for example "port=3306" in $HOME/.my.cnf, on the command line for example "./ocelotgui --port=3306", or on the File|Connect dialog box.
Environment Variables. The ocelotgui program will look at these variables: HOME, LD_RUN_PATH, MYSQL_GROUP_SUFFIX, MYSQL_HISTFILE, MYSQL_HISTIGNORE, MYSQL_HOST, MYSQL_PS1, MYSQL_PWD. MYSQL_TCP_PORT, MYSQL_UNIX_PORT, MYSQL_TEST_LOGIN_FILE.
Option Files: The ocelotgui program will look in these option files: /etc/my.cnf, /etc/mysql/my.cnf, [SYSCONFDIR]/my.cnf, [defaults-extra-file], $HOME/.my.cnf, $HOME/.mylogin.cnf. Within option files, the ocelotgui program will look in these groups: [client], [mysql], [client-server], [ocelot], as well as [client-mariadb] if --ocelot_dbms=mariadb is specified, as well as groups with those names plus suffix X if --default_groups_suffix=X is specified. On Windows, the order is different: %system, %windir, [application-directory], %MYSQL_HOME%, [defaults-extra-file].
Command Line: The ocelotgui program will look at command-line arguments which are specified in short form such as "-P 3306", or which are specified in long form such as "--port=3306".
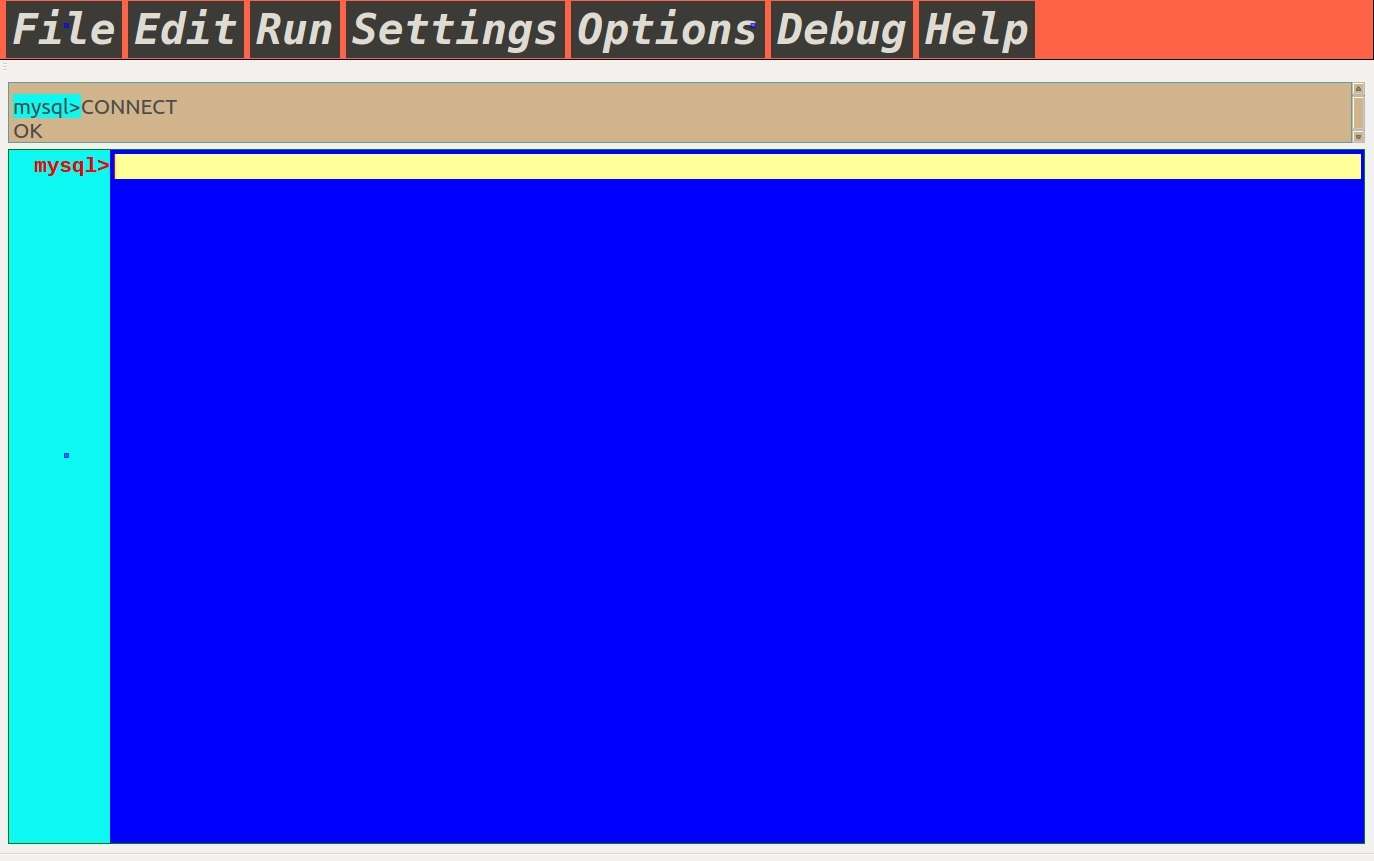
Dialog Box: A dialog box will appear if the user enters a user statement "CONNECT;" or if the user chooses menu item File|Connect. The user will be advised to do this at startup time if an initial attempt to connect fails.
Example
The default value for "port" is 3306, this is hard coded in the ocelotgui source.
The environment variable value for "port" is 3307, this is set by "export MYSQL_TCP_PORT=3307" before starting ocelotgui.
The option file value for "port" is 3308, this is set by putting "PORT=3308" in the [mysql] group in the $HOME/.mysql.cnf file.
The command-line value for "port" is 3309, this is set by putting "--port=3309" on the command line when starting the ocelotgui program.
The dialog-box value for "port" is 3310, this is set by choosing File|Connect, entering "3310" in the widget labelled "Port", and clicking "OK".
The ocelotgui program reads the settings in the above order, therefore the port number is 3310.
Options in the following table are in the same order that one sees on the File|Connect dialog box: first come the 8 important connect options (host, port, user, database, socket, password, protocol, init_command), then all the other options in alphabetical order.
Unless otherwise stated, options are specifiable by saying
[option_name] = [value] in an option file or
--[option_name] = [value] on the command line
(sometimes --[option_name] alone is sufficient for true|false values), or in the dialog box.
If an option value is irrelevant or invalid, the ocelotgui program ignores it without displaying an error message.
| Option | Description |
|---|---|
| host | Server address. Specifiable with MYSQL_HOST environment variable, with host= in an option file, with -h or --host on the command line, or in dialog box. Example values: localhost 192.15.8.44 w@ww.com. Warning: if host=localhost, ocelotgui tries to use a socket, if this is not desirable then say localhost=127.0.0.1 instead. |
| port | Port that the server listens on, if the protocol is TCP. Specifiable with MYSQL_TCP_PORT environment variable, with port= in an option file, with -P or --port on the command line, or in dialog box. Example values: 3306 3307. |
| user | User name. Specifiable with user= in an option file, with -u or --user on the command line, or in dialog box. Example values: root guest jsmith. |
| database | Database name also known as schema name. Specifiable with database= in an option file, with -D or --database on the command line, or in dialog box. Example values: test account_data. |
| socket | Socket name that the server receives on, if the protocol is SOCKET. Specifiable with socket= in an option file, with -S or --socket= on the command line, or in dialog box. Examples: var/lib/special.sock /home/user/x.sock. |
| password | Password associated with the user. Specifiable with password= in an option file, with -p or --password= on the command line, or in dialog box. If the password is required but not specified, the dialog box will always appear. Examples: sesame top_secret#1 |
| protocol | How the connection to the server occurs. Possible values are: blank or TCP or SOCKET. If host=localhost and protocol is blank, then SOCKET is assumed. Specifiable with protocol= in an option file, with --protocol= on the command line, or in dialog box. Examples: tcp socket. |
| init_command | Initial statement that should be executed as soon as connect is complete. Example: "select current_user()". |
| auto_rehash | If 1 (true), ocelotgui may try to complete names. |
| auto_vertical_output | If 1 (true), ocelotgui will display with one column per row. |
| batch | Mostly ignored, but if 1 (true), history is not written. |
| compress | If 1 (true), value is passed to the server. |
| connect_expired_password | If 1 (true), ocelotgui goes into sandbox mode if a password has expired at connect time. |
| connect_timeout | Ignored. |
| debug | Ignored. |
| debug_check | Ignored. |
| debug_info | Ignored. |
| default_auth | Ignored. |
| default_character_set | Ignored, ocelotgui needs UTF-8. |
| defaults_extra_file | Name of an additional option file. |
| defaults_file | Ignored. |
| defaults_group_suffix | Suffix that is added to the regular group names for option files. For example, if defaults_group_suffix=_X, then ocelotgui will look at options in groups client_X and mysql_X and ocelot_X in addition to options in groups client and mysql and ocelot. |
| delimiter | What ends a statement, usually semicolon ";". |
| enable_cleartext_plugin | Ignored. |
| execute | String to execute followed by program exit. |
| force | Ignored, ocelotgui always ignores errors in options. |
| help | Display a help message followed by program exit. |
| histfile | Name of file where statements are logged to, usually ".mysql_history". Ignored if batch=1. Ignored if histfile=/dev/null. |
| histignore | Pattern to ignore when writing to histfile. For example, if histignore is "*select*", then statements containing the string "select" will not be written. |
| html | Internally formats are HTML anyway even if one says html=0, unless one starts with one of the non-HTML options such as batch or xml. If one starts ocelotgui with --html --raw, the actual html markup code will appear. |
| ignore_spaces | Ignored. |
| ld_run_path | Where to look for libmysqlclient.so. Click help|libmysqlclient for details. |
| line_numbers | Ignored. |
| local_infile | If 1 (true), passed to the server. |
| login_path | Where to find login file if it's not "~/.mylogin.cnf". |
| max_allowed_packet | Passed to the server. Default 16777216. |
| max_join_size | Passed to the server. Default 1000000. |
| named_commands | Ignored. |
| net_buffer_length | Passed to the server. Default 16384. |
| no_beep | Ignored, ocelotgui does not usually beep when errors occur. |
| no_defaults | If 1 (true), options in environment variables and option files are read but not used. |
| ocelot_* | ... Options that begin with "ocelot_" are only recognized by the ocelotgui client. Everything on the Settings menu has an associated option name. The intuitively-named settings options are: ocelot_explorer_action ocelot_explorer_applicable_dbmss ocelot_explorer_applicable_types ocelot_explorer_background_color ocelot_explorer_detached ocelot_explorer_enabled ocelot_explorer_font_family ocelot_explorer_font_size ocelot_explorer_font_style ocelot_explorer_font_weight ocelot_explorer_height ocelot_explorer_left ocelot_explorer_shortcut ocelot_explorer_text ocelot_explorer_text_color ocelot_explorer_top ocelot_explorer_visible ocelot_explorer_width ocelot_extra_rule_1_text_color ocelot_extra_rule_1_background_color ocelot_extra_rule_1_condition ocelot_extra_rule_1_display_as ocelot_grid_text_color ocelot_grid_background_color ocelot_grid_header_background_color ocelot_grid_font_family ocelot_grid_font_size ocelot_grid_font_style ocelot_grid_font_weight ocelot_grid_cell_border_color ocelot_grid_cell_border_size ocelot_grid_detached ocelot_grid_html_settings ocelot_grid_left ocelot_grid_top ocelot_grid_width ocelot_grid_height ocelot_grid_focus_cell_background_color ocelot_grid_outer_color ocelot_grid_cell_height ocelot_grid_cell_width ocelot_grid_tabs ocelot_grid_tooltip ocelot_history_text_color ocelot_history_background_color ocelot_history_border_color ocelot_history_font_family ocelot_history_font_size ocelot_history_font_style ocelot_history_font_weight ocelot_menu_text_color ocelot_history_detached ocelot_menu_background_color ocelot_menu_border_color ocelot_menu_font_family ocelot_menu_font_size ocelot_menu_font_style ocelot_menu_font_weight ocelot_statement_text_color ocelot_statement_background_color ocelot_statement_border_color ocelot_statement_font_family ocelot_statement_font_size ocelot_statement_font_style ocelot_statement_font_weight ocelot_statement_highlight_literal_color ocelot_statement_highlight_identifier_color ocelot_statement_highlight_comment_color ocelot_statement_highlight_operator_color ocelot_statement_highlight_keyword_color ocelot_statement_prompt_background_color ocelot_statement_highlight_function_color ocelot_statement_highlight_current_line_color ocelot_statement_detached. See also: the ocelot_ options which aren't related to Settings, below. | See also: the example.cnf file.
| ocelot_client_side_functions | ocelot_client_side_functions=0 turns off the client-side functions, such as "select row_number() over ...". This may be unnecessary with newer versions of MariaDB. The default is 1. |
| ocelot_dbms | --ocelot_dbms=x means assume the server DBMS is x until connection is made. The possible values are 'mysql', 'mariadb', and 'tarantool'. The default is 'mysql'. |
| ocelot_grid_tabs | ocelot_grid_tabs=5 means assume that a stored procedure can return up to 5 result sets. The default is 16. |
| ocelot_language | --ocelot_language='english' means the menu and the client error messages should be in English, --ocelot_language='french' means the menu and the client error messages should be in French. The default is 'english'. |
| ocelot_statement_syntax_checker | setting ocelot_statement_syntax_checker=1 turns on the syntax checker; setting ocelot_statement_syntax_checker=2 turns on the syntax checker and is insistent -- if ocelotgui doesn't like the syntax checker, a confirmation dialog box will appear. The default is 1. |
| ocelot_shortcut_* | ocelot_shortcut_connect, ocelot_shortcut_exit, etc. ... You can change what the shortcut is, for any menu item, by specifying its name and a new keysequence. For example: SET ocelot_shortcut_paste = 'Ctrl+Shift+K'; but since verson 2.4 it is better to say SET ocelot_query = UPDATE menus SET shortcut='Ctrl+Shift+K' WHERE id = 'action_edit_paste'; |
| one_database | Ignored. |
| pager | Ignored. |
| pipe | Ignored. |
| plugin_dir | Ignored. |
| print_defaults | If 1 (true), ocelotgui displays defaults and exits. |
| prompt | What to display on left of statement lines. Default is "mysql>". The prompt can include special character sequences for date, time, and line number. |
| quick | Ignored. |
| raw | Ignored. |
| reconnect | Ignored. |
| safe_updates | If 1 (true), ocelotgui passes 1 to the server. |
| secure_auth | If 1 (true), ocelotgui passes 1 to the server. |
| select_limit | The maximum number of rows to select; default is 0 which means infinity; ocelotgui passes this to the server. |
| server_public_key | Ignored. |
| shared_memory_base_name | Ignored. |
| show_warnings | If 1 (true), ocelotgui displays warnings which result from problems that the server detects. |
| sigint_ignore | If 1 (true), ocelotgui will not stop statements when user types control-C or chooses the menu item Run|Kill. |
| silent | Ignored. |
| ssl_* | ssl, ssl_ca, ssl_capath, ssl_cert, ssl_cipher, ssl_crl, ssl_crlpath, ssl_key, ssl_verify_server_cert. SSL options are accepted and passed to the server. |
| syslog | Ignored. |
| table | Ignored. |
| tee | Name of a file to dump statements and results to. |
| unbuffered | Ignored. |
| verbose | Ignored. |
| version | If 1 (true), ocelotgui displays a version number and exits. |
| vertical | If 1 (true), results are displayed with one column per line. |
| wait | Ignored. |
| xml | If one starts with ocelotgui --xml, the grid display will show raw xml. See also --html. |
Appendix 2 Reference for the ocelotgui debugger (ocelotgui)
Before trying to read this reference, it is a good idea to become familiar with the ocelotgui client and try out the simple demonstration on the ocelot.ca blog.
Temporary warning: for debugging MySQL version 8.0 routines, you need a recent ocelotgui version as pushed to source on or after June 2018. Use ocelotgui version 1.0.7 or later.
All debug statements can be entered on the Statement widget,
optionally ending with ";".
Some debug statements can be invoked via the menu or with shortcut keys.
Like other statements, debug statements are editable, are logged,
and can cause error or warning messages to appear in the history.
Most statements can be entered even while the routine is running.
Warning: the focus can change, be sure that the cursor is blinking
on the Statement Widget and not on the Debug Widget before entering
a statement.
The following table shows statements in alphabetical order.
| Statement | What it's for | Syntax | Example | Remarks |
|---|---|---|---|---|
| $breakpoint | specifying a line where execution must stop. | $b[reakpoint [schema_identifier.] routine_identifier line_number [condition]
Shortcut: Alt+1, or via menu: Debug|Breakpoint, or click on line (If a shortcut is used, the breakpoint is set for the routine that is currently being displayed, for the line the cursor is on.) |
$breakpoint test.p 5; (The debugger must be running -- see $debug.) |
If $breakpoint succeeds, a red marker will appear on the left of the line. The breakpoint identifier will be displayed on the Debug Widget. Users can set breakpoints on any line. Users should not set breakpoints twice on the same line. Later, if the user enters $continue or $next, execution may stop when a line with a breakpoint is seen. To turn off a breakpoint, a user may click on the line (it is a "toggle" switch), or see $clear and $delete. Re condition: A condition is an expression which must be true, otherwise the breakpoint is ignored during execution. For example, $breakpoint p20 5 x = 7; sets a breakpoint which will only cause execution to halt if x = 7. The expression must have the form variable_name = literal, variable_name should be a declared variable, and the literal should be numeric. At time of writing, conditions are not well tested. |
| $clear | removing a breakpoint | $cl[ear] [schema_identifier.] routine_identifier line_number
Shortcut: Alt+6, or via menu: Debug|Clear (If a shortcut is used, the breakpoint is removed for the routine that is currently being displayed, for the line that the cursor is on.) |
$clear p 5; (The debugger must be running -- see $debug.) (The breakpoint must exist (see $breakpoint.) |
The breakpoint's red marker should disappear. If it does not disappear, and a shortcut was used: make sure the cursor is actually on the line, not just on the line number, which is considered separate. |
| $continue | running the routine till it ends or till a breakpoint. | $co[ntinue]
Shortcut: Alt+6, or via menu: Debug|Continue |
$continue; (The debugger must be running -- see $debug.) |
$continue differs from $next and $step because it does not halt on a following statement, it goes on until it reaches a line with a breakpoint or until the main routine ends. |
| $debug | beginning a debug session. | $deb[ug] [schema_identifier.] routine_identifier
[(parameter list)];
Shortcut: None, $debug is not on the Debug menu. |
$debug procedure21; $debug function_x(7); (The debugger must not be already running. The routine must be set up -- $setup.) The user must have appropriate privileges.) |
If $debug is successful, then a Debug Widget will appear (see section Debug Widget). |
| $exit | ending a debug session | $exi[t]
Shortcut: Alt+7, or via menu: Debug|Exit |
$exit; (The debugger must be running -- see $debug.) |
|
| $information status | showing information about debugger status | $inf[ormation status]
Shortcut: Alt+8, or via menu: Debug|Information (Choosing from the menu may not work on some platforms.) |
$information status; select * from xxxmdbug. information_status; |
The $information status statement will populate a table named xxxmdbug. information_status, which contains debugger_name, debugger_version, timestamp_of_status_message, number_of_status_message, icc_count, schema_identifier, routine_identifier, line_number, is_at_breakpoint, is_at_tbreakpoint, is_at_routine_exit, stack_depth, last_command, last_command_result, commands_count. The most important items of information status are displayed automatically along with the Debug Widget, so $information status is only for advanced users. |
| $install | install the debugger | $ins[tall]
Shortcut: $install is not on the Debug menu. |
$install; (The user must have appropriate privileges.) |
A large group of procedures and tables are placed in a database named xxxmdbug. Installation may take up to 20 seconds. It is only necessary to run $install once, but it may be redone, for example if a new version of ocelotgui is used. If $install is not done, none of the other debug statements are possible. |
| $leave | exit from a loop without executing | $l[eave]
Shortcut: None, $leave is not on the Debug menu. |
Suppose this routine is being debugged: begin declare x int; set x = 0; while x < 5 do set x = x + 0; end while; end The user types $continue, which gets the program running -- in an infinite loop. One way to break out of the loop is with "$set x = 6;", another way is with $leave. ($leave will also continue, so if you want to stop after leaving you must set a brekapoint.) (The debugger must be running --see $debug.) (The procedure must be executing within a loop.) |
If the $leave statement is used when the routine is not in a loop, consequences are undefined -- this is not recommended. |
| $next | Making the program go to the next statement in the current routine. | $n[ext];
Shortcut: Alt+3, or via menu: Debug|Next |
Suppose that the current line in procedure p is select f() from t; After $next, the current line changes to the line following the select statement, or (if this was the last line) routine exit. (The debugger must be running --see $debug.) |
$next is different from $step because $step can drop into a subroutine, $next does not. |
| $refresh breakpoints | showing what breakpoints exist. | $refresh breakpoints;
Shortcut: None. $refresh breakpoints is not on the Debug menu. |
$refresh breakpoints; select * from xxxmdbug. breakpoints; |
The $refresh breakpoints statement will populate a table named xxxmdbug. breakpoints, which contains breakpoint_identifier, schema_identifier, routine_identifier, routine_type, line_number_minimum, line_number_maximum, condition_identifier, condition_operator, condition_value, hit_count, is_temporary, is_temporary_and_to_be_cleared, is_matching_location, call_stack_depth_when_set, command. For simple breakpoints which were set up with $breakpoint schema.routine line_number, $refresh breakpoints is unnecessary because breakpointed lines are marked in the Debug Widget. |
| $refresh call_stack | showing what the routines are that got us here. | $refresh call_stack
Shortcut: Alt+B, or via menu: Debug|Refresh call_stack |
(Choosing from the menu may not work on some platforms.)
$refresh call_stack; select * from xxxmdbug. call_stack; |
Using menu Debug | Refresh call_stack will cause two statements: $refresh and select. The $refresh statement will populate a table named xxxmdbug. call_stack, which contains schema_identifier and routine_identifier and routine_type and line_number, with one row for each level. Thus, if routine p1 calls p2 and routine p2 calls p3, there are three rows. All $refresh statements may be blocked. |
| $refresh server variables | showing the contents of server variables. | $refresh server_variables
Shortcut: Alt+9, or via menu: Debug|Refresh server_variables (Choosing from the menu may not work on some platforms.) |
$refresh server_variables; select * from xxxmdbug. server_variables; |
Using menu Debug | Refresh server_variables will cause two statements: $refresh and select. The $refresh statement will populate a table named xxxmdbug. server_variables, which contains variable_identifier and value and old_value. For example, regardless what the routine is, the available information will include that there is a server variable named @@innodb_compression_level which originally was null but now contains 6. All $refresh statements may be blocked. This statement is slow. |
| $refresh user variables | showing the contents of user variables. | $refresh user_variables
Shortcut: Alt+A, or via menu: Debug|Refresh user_variables. (Choosing from the menu may not work on some platforms.) |
$refresh user_variables; select * from xxxmdbug. user_variables; |
Using menu Debug | Refresh user_variables will
cause two statements: $refresh and select.
The $refresh statement will populate a table
named xxxmdbug. user_variables, which contains
variable_identifier and value and old_value.
Thus, if routine p has: 1 BEGIN 2 SET @x = 1; 3 SET @x = 2; 4 END; and execution has stopped on line 3, the available information is that x is a bigint, which formerly contained 1, and now contains 2. All $refresh statements may be blocked. |
| $refresh variables | showing the contents of declared variables. | $refresh variables
Shortcut: Alt+B, or via menu: Debug|Refresh variables |
$refresh variables; select * from xxxmdbug. variables; |
Using menu Debug | Refresh variables will
cause two statements: $refresh and select.
The $refresh statement will populate a table
named xxxmdbug. variables, which contains
schema_identifier and routine_identifier and
routine_type and token_number_of_declare and
variable_identifier and data_type and value
and old_value and is_in_scope and is_settable
and is_updated_by_set. Thus, if routine p has: 1 BEGIN 2 DECLARE x int; 3 SET x = 1; 4 SET x = 2; 5 END; and execution has stopped on line 4, the available information is that x is an integer which was declared on line 2, which formerly contained 1, and now contains 2, and is in scope. All $refresh statements may be blocked. |
| $set | changing the value of a declared variable. | $set variable_name = value;
Shortcut: None, $set is not on the Debug menu. |
$set x = 55; $set y = ''k''; (The debugger must be running -- see $debug.) (The variable must be in scope.) (The value must be a literal. If it is a string literal, it must be enclosed within two quote marks -- this is due to a temporary limitation.) |
Only declared variables (variables that are specified with "DECLARE variable_name ...") can be changed with $set. There is no statement for changing user variables or system variables. $set should only be done while at a breakpoint. |
| $setup | $setu[p] [schema_identifier.] routine_identifier
[, [schema_identifier.] routine_identifier ...]
Shortcut: None, $setup is not on the Debug menu. | $setup p; $setup test.procedure1, test.function2; (The debugger must be installed -- (see $install.) (Only procedures and functions may be listed, not triggers. For "$setup X.Y", the user must have CREATE privilege in schema X and EXECUTE privilege on routine Y.) |
Unless a routine has been the object of $setup, it cannot be debugged. The $setup statement is slow, and if routines are large it is very slow. However, the effect is persistent so there is no need to run $setup for every debug session -- it only needs to be re-run if a routine is modified. The maximum number of routines per setup is 10. The $setup statement makes copies of routines, but never never changes the original routines. The default schema is what "select database();" returns. | |
| $step | Making the program go to the next statement in the current routine or a subroutine. | $st[ep]
Shortcut: Alt+5, or via menu: Debug|Step |
Suppose that the current line in procedure p is select f() from t; After $step, the current line changes to the first line in function f. (The debugger must be running -- see $debug.) |
$step is different from $next because $step can drop into a subroutine, $next does not. |
| $tbreakpoint | specifying a line where execution must stop, once. | $t[breakpoint [schema_identifier.] routine_identifier line_number
Shortcut: None, $tbreakpoint is not on the Debug menu. |
$tbreakpoint test.p 5; (The debugger must be running -- see $debug.). |
The effect is the same as for ordinary breakpoints, see $breakpoint. However, a tbreakpoint (temporary breakpoint) becomes disabled after being hit once. Generally it is better to use $breakpoint and $clear; $tbreakpoint is not recommended. |
Debug Widget
The Debug Widget appears at the bottom of the window after execution of $debug, and disappears after execution of $exit. It is a tabbed widget, that is, if $setup was done for multiple routines, then the debug widget has multiple tabs and the user can look at a particular routine by clicking its tab.
Above the widget is a line with information about current state.
The state information includes the current position (what routine
and line number is currently being executed), the result of the
last debug statement, and whether the execution is currently halted
(it will show "stopped at breakpoint" initially because there is
automatically a temporary breakpoint at the start) (it will show
"executing" if it is running) (it will show "routine end" at end).
For example the line may contain
"Debugger status = (Current position: `test`.`p24` line 3)
(Last debug command: tbreakpoint test.p24 3, result: OK, breakpoint_identifier=3)
(STOPPED AT BREAKPOINT)"
Below the tab is a display of the routine source, with line numbers on the left. This will appear to be editable; however, the only reason for that is so that $breakpoint and $clear will work. The line which is currently being executed will be highlighted. A line which has a breakpoint will have a mark on the left.
The Debug Widget shares the settings of the Statement Widget. For example, if the user clicks Settings | Statement Widget and changes the background color to yellow, then the Debug Widget will also have a yellow background.
Maintenance
The $install statement places many routines and tables in the xxxmdbug database; to uninstall, simply drop the database.
The $setup statement places copies of routines in the same databases that the original routines are in. These are not dropped automatically; users or administrators should watch for obsolete setup results.
The $refresh statements make temporary tables, which may become large but which should disappear at session end.
Privileges
To do $install, one needs authorization to create a new database, xxxmdbug, and populate it. The user who does $install may then choose to grant or revoke privileges on the procedures of xxxmdbug so that debugging is limited to certain users.
To do $setup routine_name(s), one needs authorization to execute the named routines and to create routines in the same database.
To do $debug, one needs authorization to execute both the original routine and the copy that was made by $setup. Also, one needs READ or EXECUTE authorization for objects in xxxmdbug. Also, one needs the SUPER privilege.
Security
Before allowing ocelotgui in production systems, administrators should know:
The SUPER privilege allows ordinary users to do a few things which ordinarily they can't.
For anyone who knows the workings of the system, it is possible to monitor or disrupt debugger activity. This means, for example, that if a debugger user asks what is the current value of variable X, some other user (with SUPER privilege) could see that the request was made and could see the value.
The debugger runs in a separate thread, this separate thread will attempt to do a CONNECT every time the user calls $debug, with the same options and credentials as the one used for the main thread.
For passing messages between the debugger thread and the main thread, the debugger makes heavy use of a system variable named @@init_connect. It is our belief that the debugger will not interfere with the ordinary usage of @@init_connect (for specifying what to do when connecting); however, the reverse is definitely not true. That is, if someone changes @@init_connect while the debugger is running, the debugger could return unexpected results or even hang.
Simultaneity
It is designed, but not tested in the field, that the debugger should operate while others are simultaneously accessing the same data with the same DBMS instance. Naturally the debugger will slow down other operations if (say) a user chooses to stop at a breakpoint while a table is locked -- but that is a user fault not a product flaw.
Although the debugger is not terribly fast, the majority of the time in a stored procedure is probably taken up by the SQL statements rather than the debugger's processing. Therefore it should be possible to run a long routine for hours or days, occasionally monitoring it to see what the state of the variables is.
Further information
The low-level part of the debugger is based on a product from Hewlett-Packard called MDBug. An interesting early document is http://bazaar.launchpad.net/~hp-mdbug-team/mdbug/trunk/view/head:/debugger.txt.
Appendix 3 Tarantool
NB: There is a better description of ocelotgui for Tarantool in https://github.com/ocelot-inc/ocelotgui-tarantool.
Ordinarily ocelotgui is a client for MySQL/MariaDB, and some documentation assumes that. However, it is possible to connect to Tarantool 2.x or 3.x (with SQL) instead. You get all the same features except the debugger.
The ocelotgui connection to Tarantool is not produced or approved by Tarantool.
You need the latest Tarantool "SQL" server.
The official "SQL" release is available now,
look for it on https://github.com/tarantool/tarantool/releases.
Download it according to the instructions
in the Tarantool manual,
the version number must be 2.1.2 or later.
For a more current version, download from github.com/tarantool/tarantool
and build from source as instructed in the Tarantool manual.
Usually you do not need to install the Tarantool client (libtarantool.so) library, but it is possible to use it if you build ocelotgui with "cmake ... -DOCELOT_THIRD_PARTY=0". If you did that, then this is how to get tarantool.so. The tarantool-dev package does not have it any more. Clone and follow the instructions at github.com/tarantool/tarantool-c ...
cd ~
git clone https://github.com/tarantool/msgpuck.git tarantool-msgpuck
cd tarantool-msgpuck
cmake .
make
sudo make install
cd ~
git clone https://github.com/tarantool/tarantool-c tarantool-c
cd tarantool-c
cp ~/tarantool-msgpuck/msgpuck.h third_party/msgpuck/msgpuck.h
cmake .
make
sudo make install
WARNING: in the past the tarantool-c folks have changed structs in the public API. If they do it again, ocelotgui will crash.
WARNING: On some distros the installation will be to a directory that is not on the distro's default path. For example, if libtarantool.so ends up on /usr/local/lib, you will have to say this before you start ocelotgui:
export LD_RUN_PATH=/usr/local/lib
Or you can add --ld_run_path=/usr/local/lib on the command line where you start ocelotgui. On Windows you do not need to install a Tarantool library, its code is embedded in ocelotgui.exe.
You need the latest ocelotgui client. The Release 2.4.0 version is okay at the time of release, but some things might not be up to date. It may be better to build it from source. Download from github.com/ocelot-inc/ocelotgui.
For this example we assume Tarantool 2.x. Start the Tarantool server, and say:
box.cfg{listen=3301}
-- Second connect if you want LUA '...' to work
box.schema.user.grant('guest','read,write,execute','universe')
net_box = require('net.box')
ocelot_conn2=net_box.new('localhost:3301')
ocelot_conn2:eval('return 5')
NB: user 'guest' can read and write but not create. Therefore
for demonstration purposes it is far better to be user 'admin'.
To assign a password to user 'admin', say:
box.schema.user.passwd('admin')
Start ocelotgui thus:
ocelotgui --ocelot_dbms='tarantool' --port=3301 --host='localhost' --user='admin' --password='admin'
The initial screen should come up saying "OK", you're connected.
Type some SQL statements in the statement widget at the bottom of the screen.
CREATE TABLE test1 (s1 INT PRIMARY KEY, s2 VARCHAR(5));
INSERT INTO test1 VALUES (1,'a'),(2,'b'),(3,'c');
UPDATE test1 set s2 = s2 || '!';
SELECT * FROM test1;
You'll see the usual hints appearing as you type. You'll see the usual grid display when you type Enter, or control-E.
Now type any other SQL statements, as described in the Tarantool manual. The tutorial SQL statements work.)
Now type
LUA 'return box.space._vindex:select()';
or simply
return box.space._vindex:select();
This will evaluate the expression, without SQL.
The expression must return a result set.
The result will be tabular (rows and columns),
even though box.space._vindex was created with NoSQL.
Bonus feature: A client statement,
CREATE SERVER id ... OPTIONS (PORT ..., HOST ..., USER ..., PASSWORD ...);
allows a second connection. Usually this is a connection
to a different server.
Later you can use the second connection to create an SQL table
that's populated from a NoSQL space, preserving
all the data and converting it to fit in table rows,
preserving names if they were made with a Tarantool
format clause.
* The advantage is that the second server does no work
except (lua box.space.x:select); the main server makes a
temporary copy of the result set and the main server
does all work required for select-list computations,
group by, order by, etc. That should enhance throughput.
And, since it's now an SQL table, you can create indexes
on it and do SQL manipulations without needing NoSQL.
* The limitation is that you are now working on a copy
instead of the original; it might quickly go out of date.
* The big limitation is that the first column of the new
table is automatically and always the PRIMARY KEY.
Therefore if there is any duplication in the space,
the CREATE TABLE statement will fail.
Example:
  On #1 (server/lua):
  box.cfg{listen=3301}
  box.schema.user.grant('guest','read,write,create,execute','universe')
  box.execute([[create table a (s1 int primary key, s2 varchar(15));]])
  box.execute([[insert into a values (1,'wombat');]])
  On #2 (server/lua)
  box.cfg{listen=3302}
  box.schema.user.grant('guest','read,write,create,execute','universe')
  box.execute([[CREATE TABLE t2 (x1 INT PRIMARY key, x2 VARCHAR(15));]])
  box.execute([[INSERT INTO t2 VALUES (0, 'Hi!');]])
  On ocelotgui connection:
  CREATE SERVER id FOREIGN DATA WRAPPER ocelot_tarantool OPTIONS (PORT 3302, HOST 'localhost', USER 'guest');
  CREATE TABLE y4 SERVER id LUA 'return box.space._space:select()';
  SELECT * FROM y4;
-- It does not have to be a second server, so simplify the example.
-- It does not have to be LUA '...', it can be RETURN lua-expression.
-- We can have MariaDB=main and Tarantool=remote, or Tarantool=main and Tarantool=remote
Images:
Doubtless you have image (.png or .gif or .jpg) files on your system.
For this example, change the three "box.space.timages:insert" lines,
changing the file names to file names that are on your system, or
changing the directory to wherever you installed ocelotgui documentation.
Then "copy" the example code here and "paste" it into the ocelotgui
statement widget. (Sometimes it is better to copy and paste statements
one at a time rather than all at once.)
(Important: "timages" is a quoted identifier, the quote marks are necessary.)
-- Lua function to set a variable to a file contents: based on fio_read.lua:
function load_file(file_name)
  local fio = require('fio')
  local errno = require('errno')
  local f = fio.open(file_name, {'O_RDONLY' })
  if not f then
    error("Failed to open file: "..errno.strerror())
  end
  local data = f:read(1000000)
  f:close()
  return data
end;
DROP TABLE "timages";
create table "timages" (s1 int PRIMARY KEY, s2 scalar, s3 varchar(5));
box.space.timages:insert{1, load_file('/usr/share/doc/ocelotgui/shot1.jpg'), 'shot1'};
box.space.timages:insert{2, load_file('/usr/share/doc/ocelotgui/shot2.jpg'), 'shot2'};
box.space.timages:insert{3, load_file('/usr/share/doc/ocelotgui/shot3.png'), 'shot3'};
SET ocelot_extra_rule_1_display_as = 'image';
SET ocelot_extra_rule_1_condition = 'data_type LIKE ''%BLOB''';
SELECT * FROM "timages";

Alternative: (details are left to the reader's imagination) We could instead use:
a Lua function.
Rules concerning ocelotgui when connecting to tarantool:
* All statements must end with ; (or something established by DELIMITER statement).
This applies to Lua as well as SQL.
* If you want a result set for a Lua request, you must say "return".
For example "return box.space.T:select();" rather than "box.space.T:select();"
* SQL-style comments /* ... */ will not be considered errors inside Lua statements,
but will not be passed to the server.
* Statements may contain [[...]] strings, but not =[[...]]= strings.
* Defaults are MySQL/MariaDB defaults:
--delimiter is off
but ansi_quotes is on.
* (Possible flaw) When ocelotgui is displaying an image, cpu time rises.
* Decisions to right-justify, or display as images, are automatic rather than dependent on data type.
* SQL "verbs", for example COMMIT, should not be used as Lua identifiers.
* If you use SQL, you need Tarantool 2.1 or (preferably) a later version. If you only use Lua, you can use Tarantool 1.10 or an earlier version.
* We don't accept identifiers longer than 64 characters.
If the Tarantool server version release date is after the date of the ocelotgui release, then there will probably be problems because the parsers are different. Sometimes this can be solved by downloading ocelotgui source and building again.
Appendix 4 Windows
These are extra instructions for ocelotgui for Microsoft Windows (TM).
The Windows ocelotgui program has the same functionality as the Linux ocelotgui program, but is newer and has only been tested with basic Windows 10 64-bit machinery. We believe that on some other Windows platforms it won't start.
Connection should work to any modern MySQL or MariaDB server.
How to get it:
* Download the ocelotgui zip file from github.
Check https://github.com/ocelot-inc/ocelotgui/blob/master/README.md
to see where the latest release is. For example it might be
https://github.com/ocelot-inc/ocelotgui/releases/download/2.4.0/ocelotgui-2.4.0-1.ocelotgui.zip
* Unzip. It was zipped with 7-zip from http://www.7-zip.org,
but other utilities should work. For example, on Windows command prompt,
if you have the PowerShell utility on your path:
PowerShell Expand-Archive ocelotgui-2.4.0-1.ocelotgui.zip c:\ocelotgui
* Read the COPYING and LICENSE arrangements.
On Windows ocelotgui is statically linked to Qt and MariaDB libraries,
so the copyright and licensing is not the same as for Linux.
* The unzipped package includes a file named ocelotgui.exe.
This is the file that you need for day-to-day ocelotgui use.
There is no installation file.
There is no need to download a MySQL/MariaDB client library.
There is no need to download a Qt library.
Since ocelotgui.exe may read other files on the same directory,
it is best to leave it in the directory that you unzipped to.
How to test it:
Start up a MySQL or MariaDB server that is easily accessible
(ocelotgui can use SSL etc. but for an initial test make it easy).
Let's assume the download directory is c:\ocelotgui.
Let's assume the host is 192.168.1.65, the user name is 'root',
the password is 'root', the port is 3306. Say:
c:\ocelotgui.exe --port=3306 --host=192.168.1.65 --port=3306 --user=root --password=root --protocol=tcp
Full instructions are in the main documentation.
The following notes are specifically for ocelotgui for Windows.
* When connecting, use protocol=tcp.
* this is a 32-bit .exe file
* these DLLs are used ... (they're all supplied with Windows 10)
ntdll.dll, wow64.dll, wow64win.dll, wow64cpu.dll
-- should be in system32 for 32-bit process running on a 64-bit computer
* this DLL might be used: libeay.dll.
It only matters if there is a .mylogin.cnf file, which is rare.
If libeay.dll is not found on the system, .mylogin.cnf is ignored.
* notice that the licence is slightly different from the Linux distribution,
because the MariaDB client library and the Qt library are statically linked
(in the Linux distribution they are dynamically linked and supplied separately).
* the program does not always take over the screen at start time.
You have to look for an icon on the bottom and click it,
or check the task manager.
* initial application load is very slow, although after that there are no known performance problems.
The rest of this appendix is for advanced users only.
Building ocelotgui.exe from source
The instructions for building ocelotgui.exe -- for Windows only -- are in https://github.com/ocelot-inc/ocelotgui/blob/master/README.md#Appendix-4.Appendix 5 Getting and using the ocelotgui source
The ocelotgui source package has everything necessary to compile and link and install for any Linux distribution, or FreeBSD. If the typical developer packages such as cmake and the gcc c/c++ compiler have been installed already, building an executable usually takes less than fifteen minutes.
The official location of the project is on github: https://github.com/ocelot-inc/ocelotgui. This is where the latest source files are. This is what can be "cloned". Typically, to get it, one would install git, cd to a download directory, then
git clone https://github.com/ocelot-inc/ocelotgui
A clone has the latest source, but not executables. A clone may contain patches which are not yet part of a release. Ordinarily users are advised to use a release rather than a clone, until they have used ocelotgui for a while.
The releases for ocelot-inc/ocelotgui are also on github: https://github.com/ocelot-inc/ocelotgui/releases. A release includes the source files as of the release time. Although the release does not have the "latest" source which is in ocelot-inc/ocelotgui, it usually is more stable. A release file is highlighted in green by github and is named ocelotgui-[version].tar.gz. Since version 1.0.9, there is also a release file named ocelotgui_[version].orig.tar.gz which is preferable because it does not contain unnecessary executables. Thus release 2.4.0 is at https://github.com/ocelot-inc/ocelotgui/releases/download/2.4.0/ocelotgui_2.4.0.orig.tar.gz. Typically, to get it, one would cd to a download directory, then
wget https://github.com/ocelot-inc/ocelotgui/releases/download/2.4.0/ocelotgui_2.4.0.orig.tar.gzor use a browser to go to https://github.com/ocelot-inc/ocelotgui/releases and click ocelotgui_2.4.0.orig.tar.gz.
On Debian-like systems some packages must be installed first. For example on Ubuntu:
 sudo apt-get install build-essential gcc cmake make
 #The name of the following package (containing mysql.h) varies,
 #it might be libmariadbclient-dev or libmariadb-dev
 sudo apt-get install libmysqlclient-dev
 #Do the following if and only if build is for use with Qt4
 sudo apt-get install qt4-dev-tools
 #Do the following if and only if build is for use with Qt5
 #It is okay if qt5-default is absent
 sudo apt-get install qt5-default qtbase5-dev qt5-qmake qtbase5-dev-tools
 #Do the following if and only if build is for use with Qt6
 #It might be qt-6-base-dev and qt-6-base-dev-tools
 sudo apt-get install qt6-base-dev qt6-base-dev-tools
On RPM-like systems some packages must be installed first with "yum install" or "dnf install" or "urpmi". For example on Mageia:
 urpmi gcc gcc-c++ make cmake git
 #The name of the following package (containing mysql.h) varies,
 #it might be lib64mariadb-devel or libmysqlclient-devel or mariadb-devel
 urpmi mysql-devel
 urpmi rpm-build
 #Do the following if and only if build is for use with Qt4
 urpmi libqt4-devel
 #Do the following if and only if build is for use with Qt5
 #The name of the following package varies,
 #it might be qt5-qtbase-devel
 urpmi libqt5-devel
On Fedora 35 which is an RPM-like system but might have Qt6 not Qt4 or Qt5:
sudo dnf install qt6-qtbase qt-devel qt6-qtbase-devel
On Manjaro which is an ArchLinux-like system:
# Some people would recommend sudo pacman -S base-devel
sudo pacman -S binutils make gcc cmake
sudo pacman -S mariadb-clients
(Package builds on ArchLinux-like systems can also be done with the PKGBUILD file in the ocelotgui github repository.)
Unpack all the source files by saying:
 tar -zxvf ocelotgui_2.4.0.orig.tar.gz
 cd ocelotgui-2.4.0
At this point it is a good idea to examine the file CMakeLists.txt. This file has comments about options which are available to customize the build process: CMAKE_PREFIX_PATH, CMAKE_INSTALL_PREFIX, MYSQL_INCLUDE_DIR, WITH_QT4, OCELOT_THIRD_PARTY, QT_VERSION. For explanation of these flags, read the comments in the CMakeLists.txt file. If no customizing is necessary, the typical build process is:
 make clean        # unnecessary the first time
 rm CMakeCache.txt # unnecessary the first time
 cmake .
 make
 sudo make install
The above instructions will usually put the ocelotgui program and directories in subdirectories of /usr/local, so if /usr/local/bin is on your PATH then after this saying ocelotgui will start the program. However, it is sometimes better to make and install a package, which will cause a few additional steps to be performed, such as registering so that ocelotgui can be started from the launcher. Peter Gulutzan provides scripts that will create .deb or .rpm packages. Please read the comments in the scripts before using them. For Debian-like platforms say
 ./deb_build.sh
 sudo apt install /tmp/debian3/ocelotgui_2.4.0-1_amd64.deb
 #or sudo apt install /tmp/debian3/ocelotgui_2.4.0-1_i386.deb
For RPM-like platforms say
 ./rpm_build.sh
 sudo rpm -i ~/ocelotgui_rpm//rp/rpmbuild/RPMS/x86_64/ocelotgui-2.4.0-1.x86_64.rpm
 #or sudo rpm -i ~/ocelotgui_rpm//rp/rpmbuild/RPMS/x86_64/ocelotgui-2.4.0-1.i686.rpm
Usually the result will go to subdirectories of /usr, in which case, if /usr/bin is on your PATH, then saying ocelotgui will start the program.
Some other facts about the source package, for users who like to explore code ... files with the extension *.png or *.htm or *.md or *.txt or *.jpg are for documentation, the file LICENSE.GPL is for legal requirements, and files with the extension *.cpp or *.pro or *.h are source code. The main() code is in ocelotgui.cpp. All the source code has comments. Since ocelotgui is a Qt-using program, it is also possible to use Qt Creator as an IDE editor/compiler and qmake to build -- the file ocelotgui.pro exists for this purpose, and the comments at the end of ocelotgui.pro have more explanation. For example, on Ubuntu 14.04, if the intent is to rebuild for Qt 4 from source, these instructions have been known to work:
 sudo apt-get install qt4-qmake
 sudo apt-get install libqt4-dev
 cd [path to ocelotgui source files]
 make clean
 /usr/bin/qmake-qt4 -config release
 make
For more commentary about compiling and building, read an ocelotgui.cpp comment that begins with the words "General comments". For instructions to build from source on Microsoft Windows, see Appendix 4 Windows.
Send enquiries or suggestions to Peter Gulutzan by commenting on the github site.